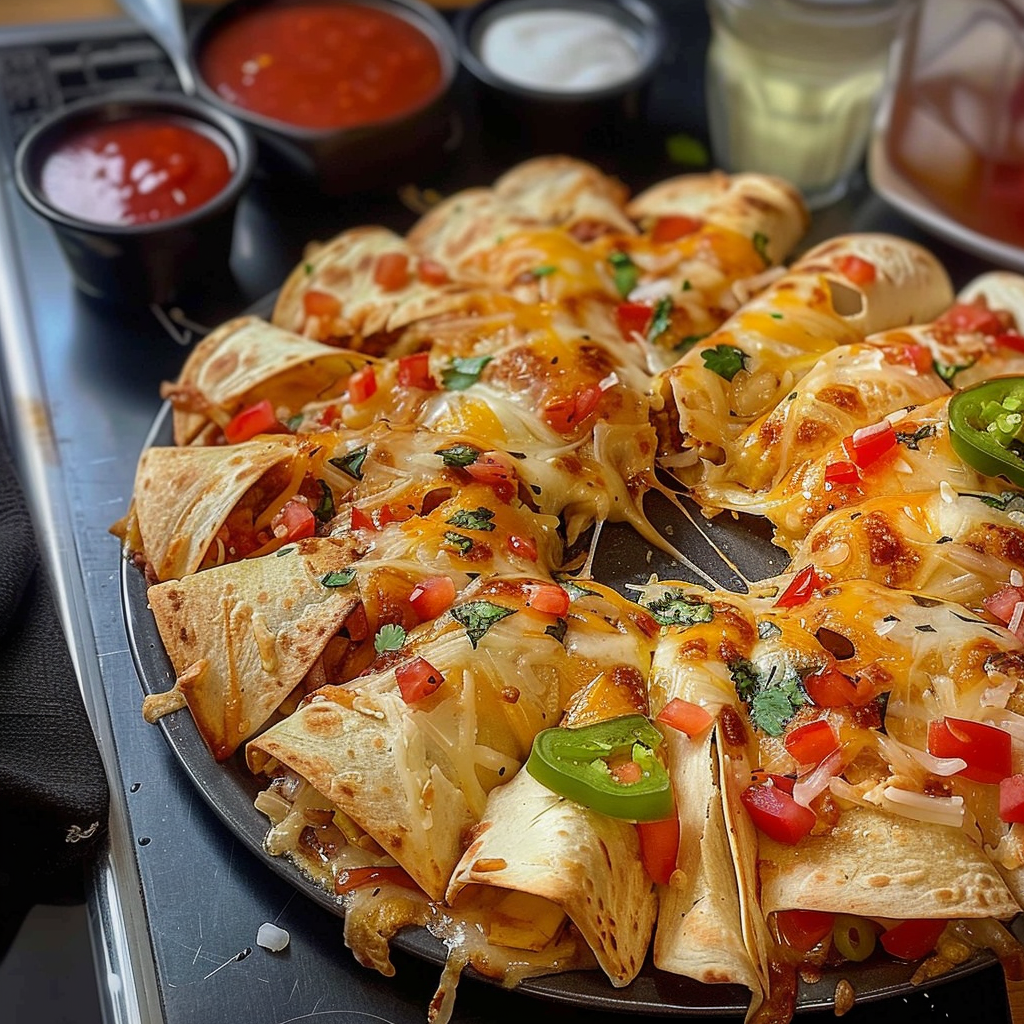
Looking for a show-stopping dish that will have everyone clamoring for the recipe? Look no further than this Blooming Quesadilla Ring! A delightful fusion of flavors and textures, this recipe is sure to become a staple in your kitchen. Bursting with cheesy goodness and savory fillings, it’s a dish that’s as fun to make as it is to eat. Let’s dive into the details and learn how to create this culinary masterpiece.
Ingredients:
2 cups cooked and shredded chicken
1 onion, chopped
1 red bell pepper, chopped
1 jalapeño, chopped
1 cup taco sauce
20 taco-size tortillas
3 cups shredded cheddar cheese
3 cups shredded Monterey Jack cheese
Instructions:
- Preparation: Preheat your oven to 375˚F and line a baking sheet with parchment paper.
- Mixing the Filling: In a large bowl, combine the shredded chicken, chopped onion, red bell pepper, jalapeño, and taco sauce. Mix well and set aside.
- Assembling the Quesadilla Cones: Cut each tortilla in half. On each tortilla half, evenly distribute approximately 2 tablespoons each of cheddar cheese, Monterey Jack cheese, and the chicken mixture. Roll the tortillas into cones, starting from the cut edge.
- Creating the Ring: Place a wide-mouth jar or glass in the center of the prepared baking sheet. Arrange about 13 tortilla cones around the jar in a circular pattern, ensuring the points of the cones are touching the jar. Sprinkle a layer of cheddar and Monterey Jack cheese over the cones. Repeat this process to create two more layers, ending with a final sprinkle of cheese.
- Baking: Carefully remove the jar from the center of the ring and transfer the baking sheet to the preheated oven. Bake for 15-20 minutes, or until the cheese is melted and the edges of the tortillas are crispy.
- Serving: Once baked, carefully transfer the Blooming Quesadilla Ring to a serving platter. Fill the center with your favorite dip and top with desired garnishes. Serve immediately and watch as it disappears in no time!
Related Recipes:
Serving Tips:
- Presentation: Serve the Blooming Quesadilla Ring on a large platter to showcase its impressive design. Placing a bowl of your favorite dip, such as guacamole, salsa, or sour cream, in the center of the ring makes for an inviting presentation.
- Garnishes: Enhance the visual appeal and flavor by topping the quesadilla ring with fresh garnishes. Consider adding chopped cilantro, diced tomatoes, sliced green onions, or a sprinkle of red chili flakes for a burst of color and flavor.
- Accompaniments: Although the quesadilla ring is a standout dish on its own, you can pair it with sides that complement its flavors. A refreshing salad, Mexican rice, or a bean dish can balance the meal and offer variety.
- Serve Warm: For the best taste and texture, serve the quesadilla ring shortly after it comes out of the oven, while the cheese is still gooey and the tortillas are perfectly crispy.
Storage Tips:
- Refrigeration: If you have leftovers, allow the quesadilla ring to cool completely before storing. Transfer the pieces to an airtight container or wrap them tightly with plastic wrap or aluminum foil. Refrigerated, the quesadilla ring can last for up to 3 days.
- Freezing: For longer storage, you can freeze the quesadilla ring. Place the cooled pieces on a baking sheet, not touching, and freeze until solid. Then, transfer the frozen pieces to a freezer-safe bag or container. Frozen, it can last for up to 2 months. Label the container with the date to keep track of freshness.
- Reheating: To maintain the best texture, reheat leftovers in the oven or a toaster oven. Preheat the oven to 350˚F and place the quesadillas on a baking sheet. Heat until the cheese is melted and the tortillas are crispy again, about 10-15 minutes. If reheating from frozen, there’s no need to thaw; just add a few extra minutes to the heating time.
By following these serving and storage tips, you’ll ensure that your Blooming Quesadilla Ring remains a delightful treat for both immediate enjoyment and future meals.
Top 5 Mistakes To Avoid:
When making a Blooming Quesadilla Ring, even a well-intended cook can stumble into common pitfalls that affect the final dish’s taste, presentation, and texture. Here are the top 5 mistakes people usually make while preparing this recipe, along with strategies to avoid them:
1. Overstuffing the Tortillas
Mistake: Adding too much filling to each tortilla half, which can cause the ingredients to spill out during rolling or baking, leading to a messy presentation and uneven cooking. How to Avoid: Use the recommended amount of filling (about 2 tablespoons each of cheese and chicken mixture) for each tortilla half. This ensures the cones hold their shape and the ingredients meld perfectly without overflowing.
2. Not Securing the Tortilla Cones
Mistake: Failing to properly secure the rolled tortilla cones can lead to them opening up during baking, which affects the blooming effect and can make the cheese spill out. How to Avoid: After rolling each tortilla cone, place them point-side down around the jar to help them stay closed. Ensure they are snugly fit against each other to help maintain their shape during baking.
3. Skimping on the Cheese
Mistake: Using too little cheese not only compromises the flavor but also affects the quesadilla ring’s ability to stick together properly, resulting in a less cohesive dish. How to Avoid: Be generous with both the cheddar and Monterey Jack cheeses, both inside the tortilla cones and sprinkled between layers. The cheese acts as a glue that holds the ring together and provides a deliciously gooey texture.
4. Incorrect Oven Temperature
Mistake: Baking at the wrong temperature can result in tortillas that are either too crispy and burnt or too soft and undercooked. How to Avoid: Preheat your oven to the correct temperature (375˚F) before baking. This ensures that the quesadilla ring cooks evenly, melting the cheese perfectly while crisping the edges of the tortillas just right.
5. Rushing the Cooling Process
Mistake: Attempting to transfer the quesadilla ring to a serving platter too soon after baking can lead to the ring breaking apart, as the cheese may not have set completely. How to Avoid: Allow the quesadilla ring to cool on the baking sheet for a few minutes after removing it from the oven. This brief resting period helps the cheese to solidify a bit, ensuring the ring maintains its shape when transferred to a serving platter.
By being mindful of these common mistakes and following the suggested precautions, you can master the art of making a perfect Blooming Quesadilla Ring that is sure to impress your guests both visually and gastronomically.
FAQs :
Can I customize the filling ingredients in the Blooming Quesadilla Ring?
Absolutely! Feel free to get creative with the filling ingredients to suit your taste preferences. You can add ingredients like black beans, corn, diced tomatoes, or even different types of cheese to customize the flavor profile of your quesadilla ring.
Can I make the Blooming Quesadilla Ring ahead of time for a party?
Yes, you can prepare the Blooming Quesadilla Ring a few hours in advance before baking. Simply assemble the quesadilla cones and arrange them on the baking sheet as instructed. Cover the baking sheet with plastic wrap and refrigerate until you’re ready to bake. Remove from the refrigerator, sprinkle with cheese, and bake according to the recipe instructions when it’s time to serve.
Can I use flour tortillas instead of corn tortillas for the Blooming Quesadilla Ring?
While corn tortillas are traditionally used for quesadillas, you can certainly use flour tortillas if you prefer. Keep in mind that flour tortillas may have a slightly different texture when baked, so adjust the baking time accordingly to ensure they are crispy around the edges.
What can I serve alongside the Blooming Quesadilla Ring for a complete meal?
To create a well-rounded meal, consider serving the Blooming Quesadilla Ring alongside Mexican-inspired side dishes such as Spanish rice, refried beans, or a fresh salad with avocado dressing. You can also offer additional toppings like sliced jalapeños, chopped cilantro, or lime wedges for added flavor and freshness.
Conclusion:
With its eye-catching presentation and irresistible flavors, this Blooming Quesadilla Ring is guaranteed to be a hit at any gathering. Whether you’re hosting a party or simply craving a delicious meal, this recipe is sure to impress. So, gather your ingredients and get ready to create a culinary masterpiece that will have everyone asking for seconds!
📖 Recipe
Print
Blooming Quesadilla Ring
- Total Time: 40 minutes
- Yield: Serves 8-10
Description
Indulge in culinary delight with our tantalizing Blooming Quesadilla Ring recipe! Bursting with savory flavors and ooey-gooey cheese, this dish is sure to impress even the most discerning palates. Perfect for any occasion, whether it’s a casual family dinner or a festive gathering with friends. Follow our easy-to-follow instructions to create a show-stopping centerpiece that will have everyone asking for seconds!
Ingredients
2 cups cooked and shredded chicken
1 onion, chopped
1 red bell pepper, chopped
1 jalapeño, chopped
1 cup taco sauce
20 taco-size tortillas
3 cups shredded cheddar cheese
3 cups shredded Monterey Jack cheese
Instructions
- Preheat the oven to 375˚F and line a baking sheet with parchment paper.
- In a bowl, mix chicken, onion, bell pepper, jalapeño, and taco sauce. Set aside.
- Cut tortillas in half. Add cheddar, Monterey Jack, and chicken mix to each half. Roll into cones.
- Place a jar in the center of the baking sheet. Arrange tortilla cones around it.
- Sprinkle cheese over the cones. Repeat layers. Remove the jar.
- Bake for 15-20 minutes until golden and crispy.
Notes
Customize fillings to your liking with beans, corn, or additional spices.
Serve with salsa, guacamole, or sour cream for dipping.
- Prep Time: 20 minutes
- Cook Time: 20 minutes
- Category: Appetizers, Main Course
- Method: Baking
- Cuisine: Mexican


