Homemade Red Velvet Cheesecake

Isabella

🌟Life, Love, and Gastronomy 🍷

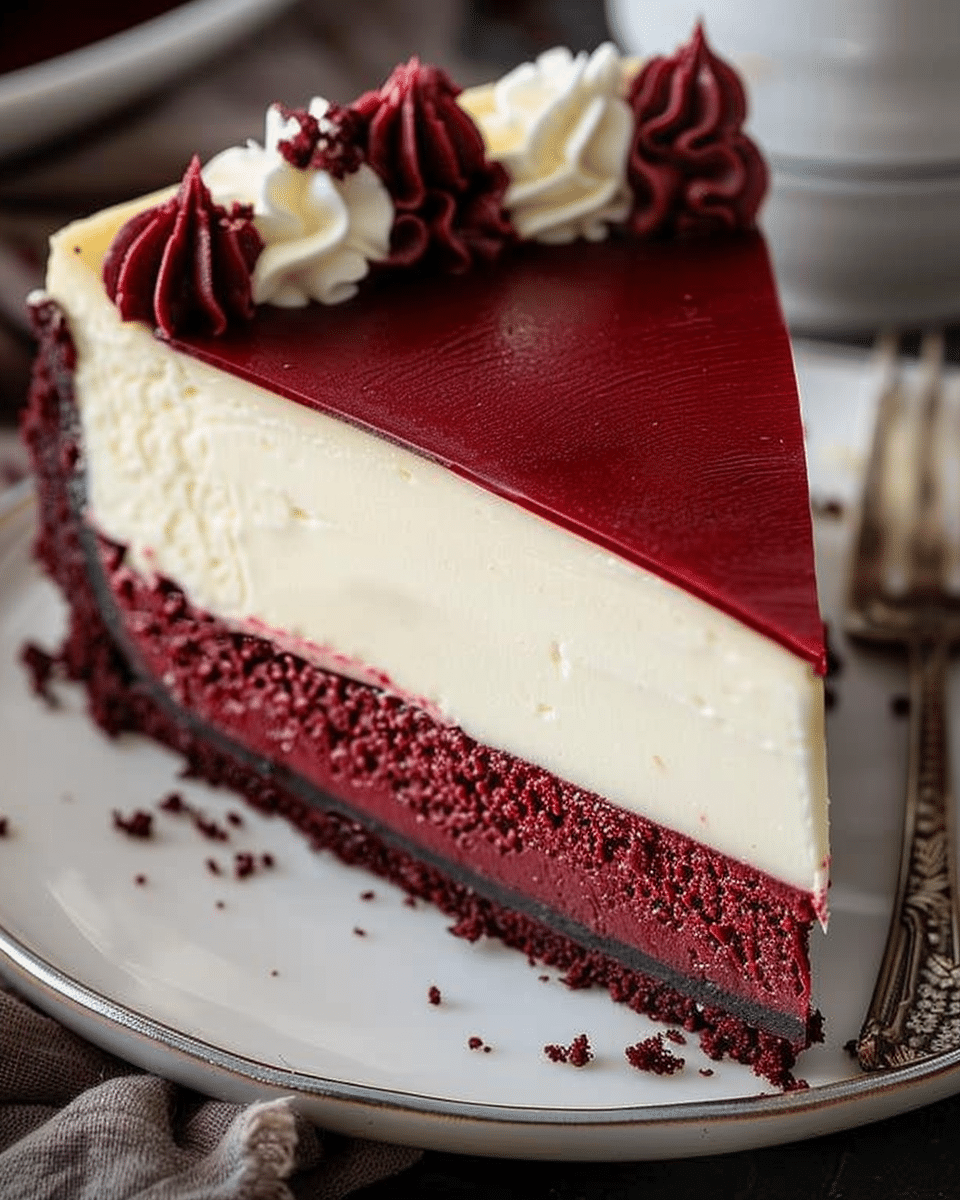
Elevate your dessert game with this Homemade Red Velvet Cheesecake, a luxurious treat that blends the classic charm of red velvet cake with the creamy richness of cheesecake. Perfect for special occasions or as an indulgent everyday dessert, this recipe features a delectable Oreo crust, a velvety red velvet filling, and a smooth cream cheese frosting that will have everyone coming back for more.

Ingredients:

For the Crust:

2 ½ cups (250 g) crushed Oreo cookies (about 30 cookies)

5 tablespoons unsalted butter, melted

For the Cheesecake:

32 ounces (908 g) cream cheese, softened

1 ⅓ cups (267 g) granulated sugar

½ cup (42 g) cocoa powder

1 cup (227 g) sour cream, room temperature

1 tablespoon white vinegar

1-2 ounces red food coloring

1 tablespoon vanilla extract

4 large eggs, room temperature, lightly beaten

For the Frosting:

4 ounces (113 g) cream cheese, softened

¼ cup (56 g) unsalted butter, softened

2 cups (260 g) confectioners’ sugar

1 teaspoon vanilla extract

Instructions:

Preheat Oven:

Move the oven rack to the lower third position and preheat your oven to 350°F (175°C). Wrap the outer bottom of a 9-inch springform pan tightly with two layers of heavy-duty aluminum foil to prevent leaks.

Make the Crust:

In a bowl, mix crushed Oreo cookies with melted butter. Press this mixture into the bottom and up the sides of the prepared springform pan. Bake for 10 minutes, then let it cool while you prepare the filling.

Prepare the Cheesecake Filling:

Reduce the oven temperature to 300°F (150°C). Beat the cream cheese on medium-low speed until smooth and creamy, about 1 minute. Add the sugar and cocoa powder, mixing until well combined.

Incorporate the sour cream, vinegar, vanilla extract, and red food coloring, mixing until smooth. Gently fold in the eggs, being careful not to overmix.

Pour the cheesecake batter over the cooled crust. Place the springform pan inside a larger roasting pan. Pour boiling water into the roasting pan until it reaches halfway up the sides of the springform pan.

Bake for 1 hour, or until the edges are set and the center is slightly jiggly. Turn off the oven and leave the cheesecake in the water bath for an additional hour. Remove from the water bath and cool on a wire rack. Run a knife around the edge to loosen, then cover and refrigerate for at least 4 hours or overnight.

Make the Frosting:

Beat the cream cheese and butter together until smooth and creamy. Gradually add confectioners’ sugar and vanilla extract, mixing on low until combined, then increase the speed to medium and beat until the frosting is smooth and fluffy.

Serve:

Just before serving, remove the sides of the springform pan. Spread the cream cheese frosting evenly over the chilled cheesecake. Slice and enjoy!

Serving Tips:

Chill Properly: Ensure the cheesecake is well chilled before serving. It should be refrigerated for at least 4 hours or overnight to set properly and achieve the right texture.

Remove from Pan: Carefully remove the sides of the springform pan before serving to avoid any mishaps and ensure a clean presentation.

Slice with Care: For clean slices, use a sharp knife that has been dipped in warm water and wiped dry between cuts. This helps to cut through the cheesecake smoothly and prevents sticking.

Garnish for Appeal: Consider adding a garnish for an extra touch of elegance. Fresh berries, a sprinkle of cocoa powder, or a drizzle of chocolate or caramel sauce can enhance both the appearance and flavor of your cheesecake.

Serve at Room Temperature: While cheesecake is best served chilled, letting it sit at room temperature for about 10-15 minutes before serving can help enhance its flavor and creaminess.

Storage Tips:

Refrigerate: Store the cheesecake in an airtight container or cover it with plastic wrap to prevent it from absorbing other odors in the refrigerator. It can be kept refrigerated for up to 5 days.

Freeze for Longer Storage: If you need to store the cheesecake for a longer period, freezing is a great option. To freeze, wrap the cheesecake tightly in plastic wrap and aluminum foil, or place it in an airtight freezer-safe container. It can be frozen for up to 2 months.

Thaw Properly: When ready to enjoy, thaw the cheesecake in the refrigerator for several hours or overnight. Avoid thawing at room temperature to prevent the texture from becoming too soft.

Freeze Individual Slices: For convenience, you can also freeze individual slices. Place them on a baking sheet to freeze solid, then transfer to a freezer-safe bag or container. This way, you can enjoy a slice whenever you crave it.

Related Recipes:

FAQs:

Can I make this cheesecake ahead of time?

Yes, you can make this Homemade Red Velvet Cheesecake ahead of time. In fact, it benefits from sitting in the refrigerator for at least 4 hours or overnight to allow the flavors to meld and the texture to set properly. You can also freeze the cheesecake or individual slices if you need to prepare it further in advance.

How do I know when the cheesecake is done baking?

The cheesecake is done when the edges are set and the center is slightly jiggly. It should not be completely firm in the center as it will continue to set while cooling. To avoid cracking, ensure the cheesecake is baked in a water bath, which helps regulate the temperature and keeps the surface smooth.

Can I use a different type of crust instead of Oreos?

Yes, you can substitute the Oreo crust with other types of crusts. Graham cracker crust, chocolate cookie crust, or even a nut-based crust can be great alternatives. Adjust the quantity and preparation method accordingly to fit the type of crust you choose.

What can I use if I don’t have red food coloring?

If you prefer not to use red food coloring, you can leave it out, but your cheesecake will not have the classic red velvet appearance. Alternatively, you could use a natural food coloring or beet juice, though it might slightly alter the flavor. For a non-colored version, you could also add a touch of cocoa powder to enhance the chocolate flavor.

Conclusion:

This Homemade Red Velvet Cheesecake is sure to impress with its rich flavors and elegant presentation. Whether you’re celebrating a special occasion or just treating yourself, this decadent dessert is the perfect way to indulge in a bit of sweetness. Enjoy every creamy, chocolatey bite!


📖 Recipe:

Print
clock clock iconcutlery cutlery iconflag flag iconfolder folder iconinstagram instagram iconpinterest pinterest iconfacebook facebook iconprint print iconsquares squares iconheart heart iconheart solid heart solid icon

Homemade Red Velvet Cheesecake


5 Stars 4 Stars 3 Stars 2 Stars 1 Star

No reviews

  • Author: Isabella
  • Total Time: 6 hours 42 minutes
  • Yield: 12 servings
  • Diet: Vegetarian

Description

Indulge in the ultimate dessert experience with this Homemade Red Velvet Cheesecake. Combining the rich, velvety texture of red velvet cake with the creamy decadence of cheesecake, this recipe features a luscious Oreo crust, a smooth red velvet filling, and a delightful cream cheese frosting. Perfect for special occasions or a luxurious treat, this cheesecake is sure to impress with its stunning appearance and irresistible flavor.


Ingredients

For the Crust:

2 ½ cups (250 g) crushed Oreo cookies (about 30 cookies)

5 tablespoons unsalted butter, melted

For the Cheesecake:

32 ounces (908 g) cream cheese, softened

1 ⅓ cups (267 g) granulated sugar

½ cup (42 g) cocoa powder

1 cup (227 g) sour cream, room temperature

1 tablespoon white vinegar

1 tablespoon vanilla extract

12 ounces red food coloring

4 large eggs, room temperature, lightly beaten

For the Frosting:

4 ounces (113 g) cream cheese, softened

¼ cup (56 g) unsalted butter, softened

2 cups (260 g) confectioners’ sugar

1 teaspoon vanilla extract


Instructions

  1. Preheat your oven to 350°F (175°C). Wrap the bottom of a 9-inch springform pan with two layers of heavy-duty aluminum foil.
  2. Mix crushed Oreo cookies with melted butter. Press into the bottom and sides of the pan. Bake for 10 minutes and let cool.
  3. Reduce oven temperature to 300°F (150°C). Beat cream cheese until smooth, then add sugar and cocoa powder. Mix in sour cream, vinegar, vanilla, and food coloring. Fold in eggs.
  4. Pour batter over crust. Place the pan in a larger roasting pan and fill with boiling water halfway up the sides of the springform pan. Bake for 1 hour. Turn off the oven and leave cheesecake in the water bath for an hour.
  5. Cool on a wire rack, then refrigerate for at least 4 hours or overnight.
  6. For the frosting, beat cream cheese and butter until creamy, then mix in confectioners’ sugar and vanilla. Frost the chilled cheesecake before serving.

Notes

Ensure the cheesecake is completely chilled before serving for the best texture.

For clean slices, use a warm, sharp knife.

Can be frozen for up to 2 months; thaw in the refrigerator before serving.

  • Prep Time: 1 hour 25 minutes
  • Additional Time: 4 hours
  • Cook Time: 1 hour 17 minutes
  • Category: Dessert
  • Method: Baking
  • Cuisine: American

Nutrition

  • Serving Size: 12 servings

Leave a Comment

Recipe rating 5 Stars 4 Stars 3 Stars 2 Stars 1 Star