
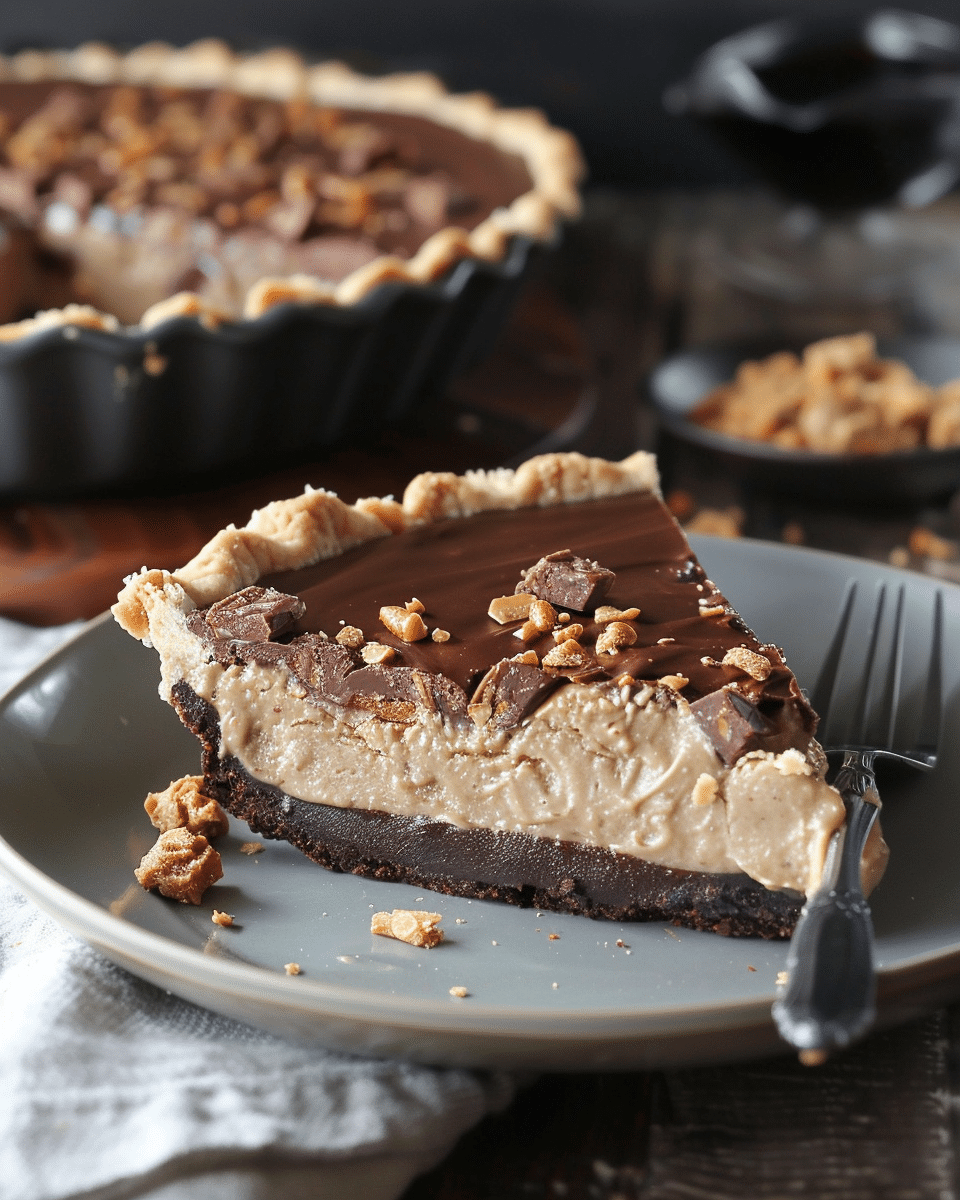
I make this Butterfinger Chocolate Peanut Butter Pie whenever I want a rich, creamy dessert without turning on the oven. It’s a smooth no-bake peanut butter filling folded with whipped topping and packed with crunchy Butterfinger candy pieces, all nestled inside a chocolate cookie crust. Every bite gives me that perfect balance of chocolate, peanut butter, and crispy candy crunch.
Why You’ll Love This Recipe
I love how incredibly easy this pie is to prepare, especially when I need a quick dessert for gatherings or holidays. Since it’s completely no-bake, I save time and avoid heating up the kitchen.
I also enjoy the combination of textures—the creamy peanut butter filling contrasts beautifully with the crunchy Butterfinger pieces. The chocolate cookie crust adds a deep cocoa flavor that complements the sweet and salty filling perfectly.
Another reason I keep coming back to this recipe is how make-ahead friendly it is. I can prepare it hours in advance, let it chill, and simply slice and serve when I’m ready.
Ingredients
(Tip: You’ll find the full list of ingredients and measurements in the recipe card below.)
1 pre-made 9-inch chocolate cookie crust
8 ounces cream cheese, softened
1 cup creamy peanut butter
1 cup powdered sugar
1 teaspoon vanilla extract
1 ½ cups whipped topping (such as Cool Whip)
6 fun-size Butterfinger candy bars, crushed (about 1 cup)
½ cup chocolate syrup (optional, for topping)
Extra crushed Butterfinger pieces for garnish
Directions
I start by placing the softened cream cheese in a large mixing bowl and beating it until completely smooth and creamy. This step ensures the filling turns out silky without lumps.
Next, I add the peanut butter, powdered sugar, and vanilla extract. I mix everything together until the texture becomes fluffy and fully combined.
I gently fold in the whipped topping, taking care not to overmix so the filling stays light and airy.
Then I stir in the crushed Butterfinger candy pieces, reserving a small handful for garnish. I love seeing those crunchy bits scattered throughout the creamy filling.
I spread the mixture evenly into the prepared chocolate cookie crust and smooth the top with a spatula.
For extra indulgence, I drizzle chocolate syrup over the surface and sprinkle the remaining crushed Butterfinger pieces on top.
Finally, I refrigerate the pie for at least 4 hours, until it’s fully set and firm. When ready to serve, I slice it chilled for the best texture and flavor.
Servings and Timing
Prep Time: 15 minutes
Cooking Time: 0 minutes
Total Time: 4 hours 15 minutes
Servings: 8 servings
Calories: 520 kcal per serving
Variations
I sometimes swap the chocolate cookie crust for a graham cracker crust when I want a slightly lighter chocolate flavor.
If I want even more chocolate intensity, I mix mini chocolate chips into the filling.
For a frozen twist, I place the pie in the freezer for a couple of hours and serve it semi-frozen for an ice-cream-like texture.
I also enjoy experimenting with different candy bars if I want to change the flavor profile while keeping the same creamy base.
Storage/Reheating
I store this pie covered in the refrigerator for up to 4 days. I make sure it’s tightly wrapped or placed in an airtight container to keep it fresh and prevent it from absorbing other fridge odors.
If I want to store it longer, I freeze it for up to 1 month. I wrap it securely in plastic wrap and foil, then thaw it in the refrigerator before serving.
Since this is a no-bake dessert, I don’t reheat it. I always serve it chilled for the best consistency and flavor.
Related Recipes:
- Peanut Butter Butterfinger Cookies
- Easy Butterfinger Balls
- Thick and Chewy Peanut Butter Butterfinger Cookies
FAQs
Can I make this pie ahead of time?
Yes, I often prepare it the day before serving. I find that chilling overnight actually improves the texture and helps the flavors meld beautifully.
Can I use homemade whipped cream instead of whipped topping?
I can substitute homemade whipped cream, but I make sure it’s whipped to stiff peaks so the filling holds its shape properly.
What if I don’t have a chocolate cookie crust?
I use a graham cracker crust or even an Oreo-style crust as a substitute. Both work well with the peanut butter filling.
Can I freeze the pie to set it faster?
I can place it in the freezer for about 1–2 hours to help it firm up more quickly, but I avoid freezing it solid unless I want a frozen-style dessert.
How do I get clean slices when cutting the pie?
I run a sharp knife under hot water, wipe it dry, and slice. I repeat this between cuts to keep each slice neat and clean.
Conclusion
I find this Butterfinger Chocolate Peanut Butter Pie to be one of the easiest and most satisfying no-bake desserts I make. The creamy peanut butter filling, crunchy candy pieces, and chocolate crust create a dessert that always impresses family and friends. Whenever I need something simple yet indulgent, this pie is my go-to recipe.
📖 Recipe:
Print
Butterfinger Chocolate Peanut Butter Pie
5 Stars 4 Stars 3 Stars 2 Stars 1 Star
No reviews
- Author: Isabella
- Total Time: 4 hours 15 minutes
- Yield: 8 servings
- Diet: Vegetarian
Description
A rich and creamy no-bake Butterfinger Chocolate Peanut Butter Pie made with a smooth peanut butter filling, crunchy Butterfinger candy pieces, and a chocolate cookie crust, perfect for an easy make-ahead dessert.
Ingredients
1 pre-made 9-inch chocolate cookie crust
8 ounces cream cheese, softened
1 cup creamy peanut butter
1 cup powdered sugar
1 teaspoon vanilla extract
1 ½ cups whipped topping (such as Cool Whip)
6 fun-size Butterfinger candy bars, crushed (about 1 cup)
½ cup chocolate syrup (optional, for topping)
Extra crushed Butterfinger pieces for garnish
Instructions
- Place the softened cream cheese in a large mixing bowl and beat until completely smooth and creamy.
- Add the peanut butter, powdered sugar, and vanilla extract. Mix until fully combined and fluffy.
- Gently fold in the whipped topping, being careful not to overmix to keep the filling light and airy.
- Stir in the crushed Butterfinger candy pieces, reserving a small amount for garnish.
- Spread the filling evenly into the prepared chocolate cookie crust and smooth the top with a spatula.
- Drizzle chocolate syrup over the top if desired and sprinkle with the remaining crushed Butterfinger pieces.
- Refrigerate for at least 4 hours, or until fully set. Slice and serve chilled.
Notes
Chill overnight for best texture and flavor.
Substitute graham cracker or Oreo-style crust if preferred.
Ensure homemade whipped cream is whipped to stiff peaks if using instead of whipped topping.
Freeze for 1–2 hours to speed up setting, or freeze longer for a frozen-style dessert.
For clean slices, run a knife under hot water, wipe dry, and repeat between cuts.
- Prep Time: 15 minutes
- Cook Time: 0 minutes
- Category: Dessert
- Method: No-Bake
- Cuisine: American
Nutrition
- Serving Size: 1 slice
- Calories: 520 kcal
- Sugar: 38 g
- Sodium: 320 mg
- Fat: 36 g
- Saturated Fat: 14 g
- Unsaturated Fat: 20 g
- Trans Fat: 0.5 g
- Carbohydrates: 45 g
- Fiber: 2 g
- Protein: 9 g
- Cholesterol: 45 mg


