Chocolate Chip Teddy Bear Cookies

Isabella

🌟Life, Love, and Gastronomy 🍷

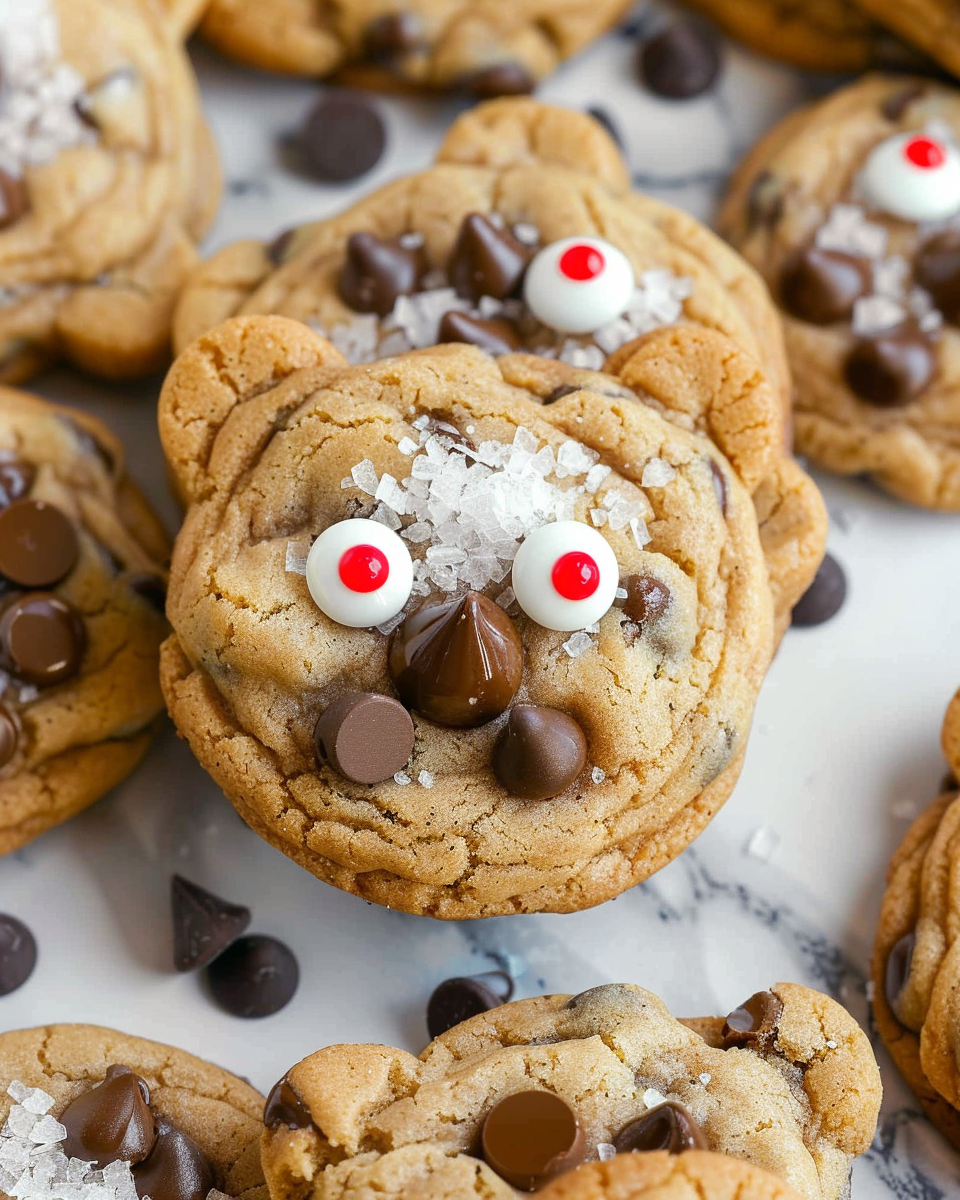
These Chocolate Chip Teddy Bear Cookies are as fun to make as they are to eat! With their cute bear shapes, soft and chewy texture, and generous chocolatey goodness, they are perfect for kids and adults alike. Whether you’re baking for a party, a school event, or just for fun, these cookies are sure to bring smiles all around.

Ingredients:

2 1/4 cups all-purpose flour

1/2 teaspoon baking soda

1/2 teaspoon salt

3/4 cup unsalted butter, softened

1/2 cup granulated sugar

1 teaspoon vanilla extract

3/4 cup brown sugar, packed

1 large egg

1 cup mini chocolate chips

Chocolate chips and candy eyes for decorating

Directions:

Preheat the Oven:

Start by preheating your oven to 350°F (175°C). Line a baking sheet with parchment paper to prevent the cookies from sticking.

Mix the Dry Ingredients:

In a medium bowl, whisk together 2 1/4 cups of all-purpose flour, 1/2 teaspoon of baking soda, and 1/2 teaspoon of salt. This will ensure that your cookies rise properly and have a balanced flavor.

Cream the Butter and Sugars:

In a large bowl, beat 3/4 cup of softened unsalted butter, 1/2 cup of granulated sugar, and 3/4 cup of packed brown sugar until the mixture is light and fluffy. Add 1 teaspoon of vanilla extract and 1 large egg, beating until everything is well combined.

Combine the Ingredients:

Gradually add the dry ingredients to the wet ingredients, mixing until just combined. Gently fold in 1 cup of mini chocolate chips, making sure they’re evenly distributed throughout the dough.

Shape the Teddy Bears:

Using a tablespoon, scoop out portions of dough for the teddy bear’s body. Then, take smaller portions for the head and limbs. Assemble each bear on the baking sheet, using chocolate chips for the nose and placing candy eyes to give them personality.

Bake the Cookies:

Place the baking sheet in the preheated oven and bake for 10-12 minutes, or until the edges are lightly golden. Once baked, let the cookies cool on the sheet for 5 minutes before transferring them to a wire rack to cool completely.

Serving Tips:

Presentation: Arrange the cookies on a colorful plate or platter. For a fun touch, place them in a teddy bear-themed container or basket.

Pairings: Serve with a glass of milk, hot chocolate, or a warm cup of tea. The combination enhances the chocolate flavor and makes for a cozy treat.

Garnish: Add some sprinkles, crushed nuts, or extra chocolate chips on top of the cookies before baking for added texture and decoration.

Festive Touches: Use seasonal decorations (like themed cookie cutters or colored icing) to customize the cookies for holidays or special occasions.

Storage Tips:

Room Temperature: Store the cookies in an airtight container at room temperature for up to one week. This helps retain their softness and chewiness.

Freezing: For longer storage, you can freeze the cookies. Place them in a single layer on a baking sheet until frozen, then transfer to a freezer-safe bag or container. They can be stored for up to three months.

Thawing: To enjoy frozen cookies, simply remove them from the freezer and let them thaw at room temperature for about 30 minutes. You can also warm them in the microwave for a few seconds for that freshly-baked taste.

Layering: If stacking cookies in a container, place parchment paper between layers to prevent them from sticking together.

Related Recipes:

FAQs:

Can I use regular chocolate chips instead of mini chocolate chips?

Yes, you can substitute regular chocolate chips for mini chocolate chips if that’s what you have on hand. However, keep in mind that larger chocolate chips may not distribute as evenly throughout the dough, so you might want to chop them into smaller pieces for a better texture.

Can I make these cookies ahead of time?

Absolutely! You can prepare the cookie dough in advance and store it in the refrigerator for up to 3 days before baking. Alternatively, you can freeze the cookie dough in individual portions and bake them directly from the freezer, adding an extra minute or two to the baking time.

How can I make these cookies gluten-free?

To make gluten-free Chocolate Chip Teddy Bear Cookies, simply substitute the all-purpose flour with a 1:1 gluten-free flour blend. Make sure the blend contains xanthan gum or add it separately as needed for proper texture.

What should I do if my cookies spread too much while baking?

If your cookies spread too much, it could be due to warm dough or insufficient flour. Make sure your butter is softened, not melted, when mixing. If the dough seems too soft, chill it in the refrigerator for 30 minutes before baking to help maintain their shape. Additionally, ensure you measure your flour accurately, using the spoon-and-level method or a kitchen scale.

Conclusion:

These Chocolate Chip Teddy Bear Cookies are a delightful treat that will bring joy to any gathering. Their cute appearance and delicious flavor make them a hit with both children and adults. Get your family involved in the baking process, and enjoy the fun of creating these adorable cookies together! Happy baking!


📖 Recipe:

Print
clock clock iconcutlery cutlery iconflag flag iconfolder folder iconinstagram instagram iconpinterest pinterest iconfacebook facebook iconprint print iconsquares squares iconheart heart iconheart solid heart solid icon

Chocolate Chip Teddy Bear Cookies


  • Author: Isabella
  • Total Time: 27 minutes
  • Yield: 24 cookies
  • Diet: Vegetarian

Description

These adorable Chocolate Chip Teddy Bear Cookies are fun to make and even more delightful to eat! Soft, chewy, and filled with chocolatey goodness, these cookies are perfect for kids and adults alike. Decorated like cute teddy bears, they make a fantastic treat for parties, school events, or family gatherings. Bake a batch today and enjoy the smiles they bring!


Ingredients

2 1/4 cups all-purpose flour

1/2 teaspoon baking soda

1/2 teaspoon salt

3/4 cup unsalted butter, softened

1/2 cup granulated sugar

3/4 cup brown sugar, packed

1 teaspoon vanilla extract

1 large egg

1 cup mini chocolate chips

Additional chocolate chips and candy eyes for decorating


Instructions

  1. Preheat the Oven: Preheat your oven to 350°F (175°C) and line a baking sheet with parchment paper.
  2. Mix the Dry Ingredients: In a medium bowl, whisk together the flour, baking soda, and salt.
  3. Cream the Butter and Sugars: In a large bowl, beat the softened butter, granulated sugar, and brown sugar until light and fluffy. Add the vanilla extract and egg, and beat until well combined.
  4. Combine the Ingredients: Gradually add the dry ingredients to the wet ingredients and mix until combined. Fold in the mini chocolate chips.
  5. Shape the Teddy Bears: Scoop tablespoon-sized portions of dough for the body, then smaller portions for the head and limbs. Assemble each bear on the baking sheet, adding chocolate chips for the nose and candy eyes.
  6. Bake the Cookies: Bake for 10-12 minutes, or until the edges are lightly golden. Let the cookies cool on the baking sheet for 5 minutes before transferring them to a wire rack.

Notes

For added flavor, consider mixing in chopped nuts or using flavored extracts.

Customize your teddy bears with different candy or icing decorations for various occasions.

  • Prep Time: 15 minutes
  • Cook Time: 12 minutes
  • Category: Dessert
  • Method: Baking
  • Cuisine: American

Nutrition

  • Serving Size: 24 cookies
  • Calories: 150 kcal

Keywords: Chocolate Chip Cookies, Teddy Bear Cookies, Kids Cookies, Fun Baking, Cute Cookies, Chewy Cookies, Chocolate Treats, Cookie Decorating, Family Recipes, Holiday Baking

Leave a Comment

Recipe rating