
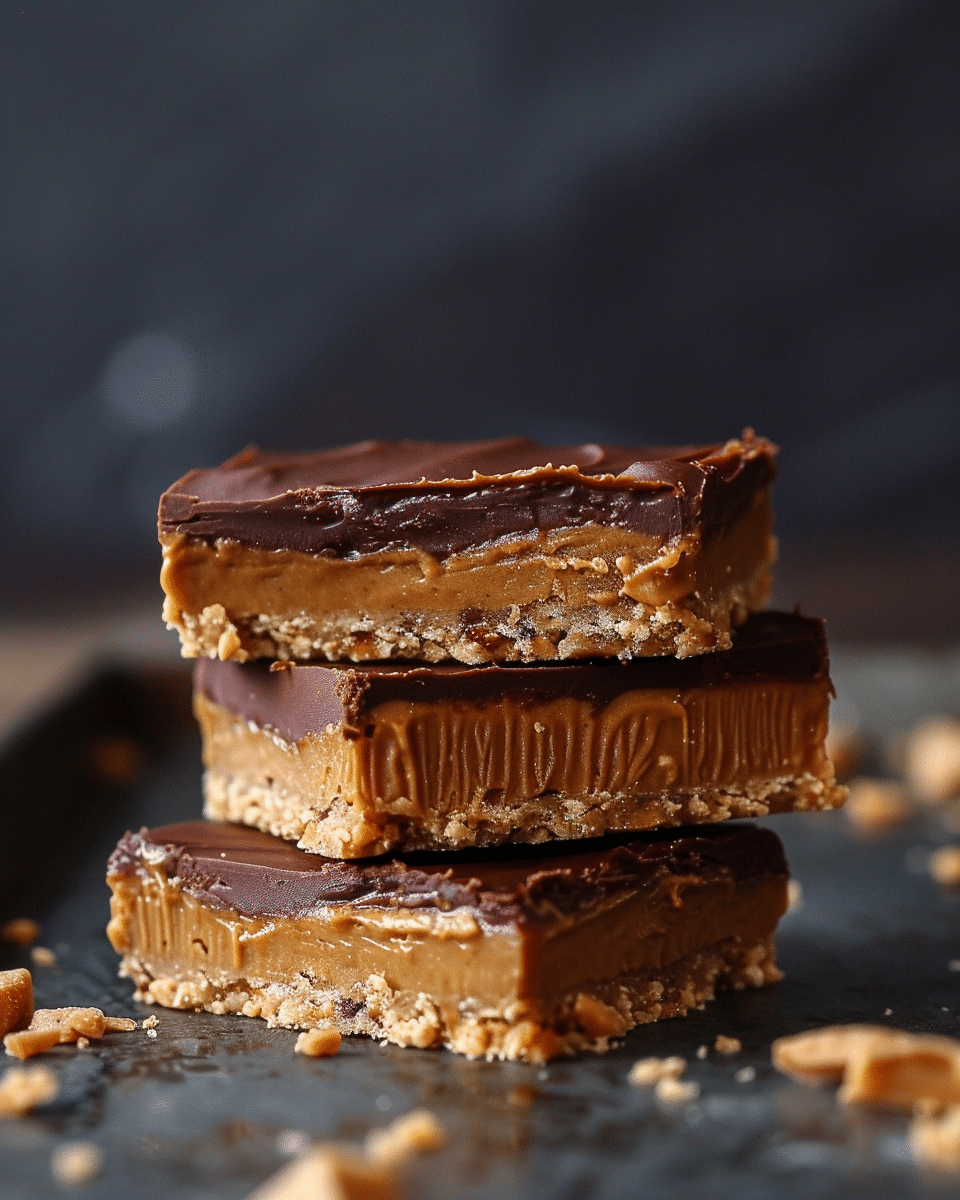
I love recreating nostalgic treats at home, and these Disneyland Peanut Butter Bars bring all the sweet memories right into my kitchen. With a buttery graham cracker base, a rich and creamy peanut butter layer, and a thick blanket of smooth chocolate on top, I get that classic bakery-style flavor in every bite. I find them even better homemade because I can control the ingredients and make them extra fresh.
Why You’ll Love This Recipe
I love how simple and foolproof these bars are. Since they are completely no-bake, I don’t need to turn on the oven, which makes them perfect for warm days or busy schedules.
I also enjoy the balance of sweet and salty flavors. The peanut butter layer is soft and rich, while the chocolate topping adds just the right snap.
I find these bars perfect for parties, holidays, or family gatherings because they slice beautifully and serve a crowd with ease. Every time I make them, they disappear quickly.
Ingredients
(Tip: You’ll find the full list of ingredients and measurements in the recipe card below.)
14 whole graham cracker sheets, finely crushed
2 cups creamy peanut butter
8 tablespoons butter, melted
2 teaspoons vanilla extract
1/2 teaspoon salt
3 1/2 cups powdered sugar
4 tablespoons shortening
4 cups semi-sweet chocolate chips
Directions
I start by lining a 9×13-inch baking pan with parchment paper, leaving some overhang so I can easily lift the bars out later.
I place the graham cracker sheets in a food processor and pulse them into fine crumbs. If I do not have a food processor, I seal them in a zip-top bag and crush them with a rolling pin.
In a large mixing bowl, I combine the crushed graham crackers, creamy peanut butter, melted butter, vanilla extract, salt, and powdered sugar. I stir everything together until fully combined and thick. The texture should resemble a soft dough.
I press the peanut butter mixture evenly into the prepared pan and smooth the top with a spatula. Then I refrigerate it for at least 30 minutes to firm up.
In a microwave-safe bowl, I combine the semi-sweet chocolate chips and shortening. I microwave in 30-second intervals, stirring between each round, until the mixture is completely melted and smooth.
I pour the melted chocolate over the chilled peanut butter layer and spread it evenly across the surface.
I return the pan to the refrigerator and chill for 1 to 2 hours, or until the chocolate is fully set.
Once firm, I lift the bars out using the parchment paper and slice them into squares or rectangles. For clean cuts, I use a sharp knife warmed under hot water and wiped dry.
Servings and timing
I prepare these bars in about 20 minutes, with 5 minutes of melting time for the chocolate. The total time, including chilling, is about 1 hour and 25 minutes.
This recipe makes 24 servings, and each serving contains approximately 420 calories.
Variations
I sometimes use crunchy peanut butter instead of creamy when I want extra texture.
I like to swap semi-sweet chocolate chips for milk chocolate if I prefer a sweeter finish.
When I want a deeper flavor, I add a pinch of flaky sea salt on top of the melted chocolate before chilling.
For a fun twist, I mix mini chocolate chips directly into the peanut butter layer for extra chocolate in every bite.
Storage/Reheating
I store these bars in an airtight container in the refrigerator for up to one week. I like keeping them chilled because it helps the chocolate stay firm and the bars hold their shape.
If I want a slightly softer texture, I let them sit at room temperature for about 10 to 15 minutes before serving.
I can also freeze the bars for up to 2 months. I place parchment paper between layers and store them in a freezer-safe container. When I am ready to enjoy them, I thaw them overnight in the refrigerator.
Related Recipes:
FAQs
Can I use natural peanut butter?
I find that regular creamy peanut butter works best because natural peanut butter can be too oily and may prevent the bars from setting properly.
Can I make these bars without shortening?
I can omit the shortening, but I notice the chocolate topping is slightly less smooth and firm. The shortening helps create that classic bakery-style finish.
How do I get perfectly clean slices?
I use a sharp knife warmed under hot water, then wipe it dry before each cut. This keeps the chocolate from cracking and gives neat edges.
Can I make these bars ahead of time?
I often make them a day in advance and store them in the refrigerator. I find they taste even better once fully chilled and set.
Do I need to bake the crust?
No, I do not bake the crust. The graham cracker and peanut butter mixture firms up perfectly in the refrigerator.
Conclusion
I always enjoy making these Disneyland Peanut Butter Bars because they combine simplicity with nostalgic flavor. The creamy peanut butter base and smooth chocolate topping create a rich, satisfying treat that feels both comforting and indulgent. Whenever I need an easy crowd-pleasing dessert, I turn to this recipe and know it will be a success.
📖 Recipe:
Print
Disneyland Peanut Butter Bars
5 Stars 4 Stars 3 Stars 2 Stars 1 Star
No reviews
- Author: Isabella
- Total Time: 1 hour 25 minutes
- Yield: 24 bars
- Diet: Vegetarian
Description
These Disneyland Peanut Butter Bars feature a buttery graham cracker base, a rich and creamy peanut butter layer, and a smooth chocolate topping. This easy no-bake dessert is perfect for parties, holidays, or anytime you crave a nostalgic, crowd-pleasing treat.
Ingredients
14 whole graham cracker sheets, finely crushed
2 cups creamy peanut butter
8 tablespoons butter, melted
2 teaspoons vanilla extract
1/2 teaspoon salt
3 1/2 cups powdered sugar
4 tablespoons shortening
4 cups semi-sweet chocolate chips
Instructions
- Line a 9×13-inch baking pan with parchment paper, leaving overhang on the sides for easy removal.
- Pulse the graham cracker sheets in a food processor until fine crumbs form, or crush them in a sealed zip-top bag using a rolling pin.
- In a large mixing bowl, combine graham cracker crumbs, peanut butter, melted butter, vanilla extract, salt, and powdered sugar. Mix until fully combined and thick, resembling a soft dough.
- Press the mixture evenly into the prepared pan and smooth the top with a spatula. Refrigerate for at least 30 minutes until firm.
- In a microwave-safe bowl, combine chocolate chips and shortening. Microwave in 30-second intervals, stirring between each, until melted and smooth.
- Pour the melted chocolate over the chilled peanut butter layer and spread evenly.
- Refrigerate for 1 to 2 hours, or until the chocolate is fully set.
- Lift the bars out using the parchment paper and slice into squares or rectangles using a sharp knife warmed under hot water and wiped dry for clean cuts.
Notes
Use crunchy peanut butter for added texture.
Swap semi-sweet chocolate chips for milk chocolate for a sweeter flavor.
Sprinkle flaky sea salt over the melted chocolate for a sweet-salty finish.
Store in an airtight container in the refrigerator for up to 1 week.
Freeze for up to 2 months with parchment paper between layers.
Let sit at room temperature for 10–15 minutes before serving for a softer texture.
- Prep Time: 20 minutes
- Cook Time: 5 minutes
- Category: Dessert
- Method: No-Bake
- Cuisine: American
Nutrition
- Serving Size: 1 bar
- Calories: 420


