
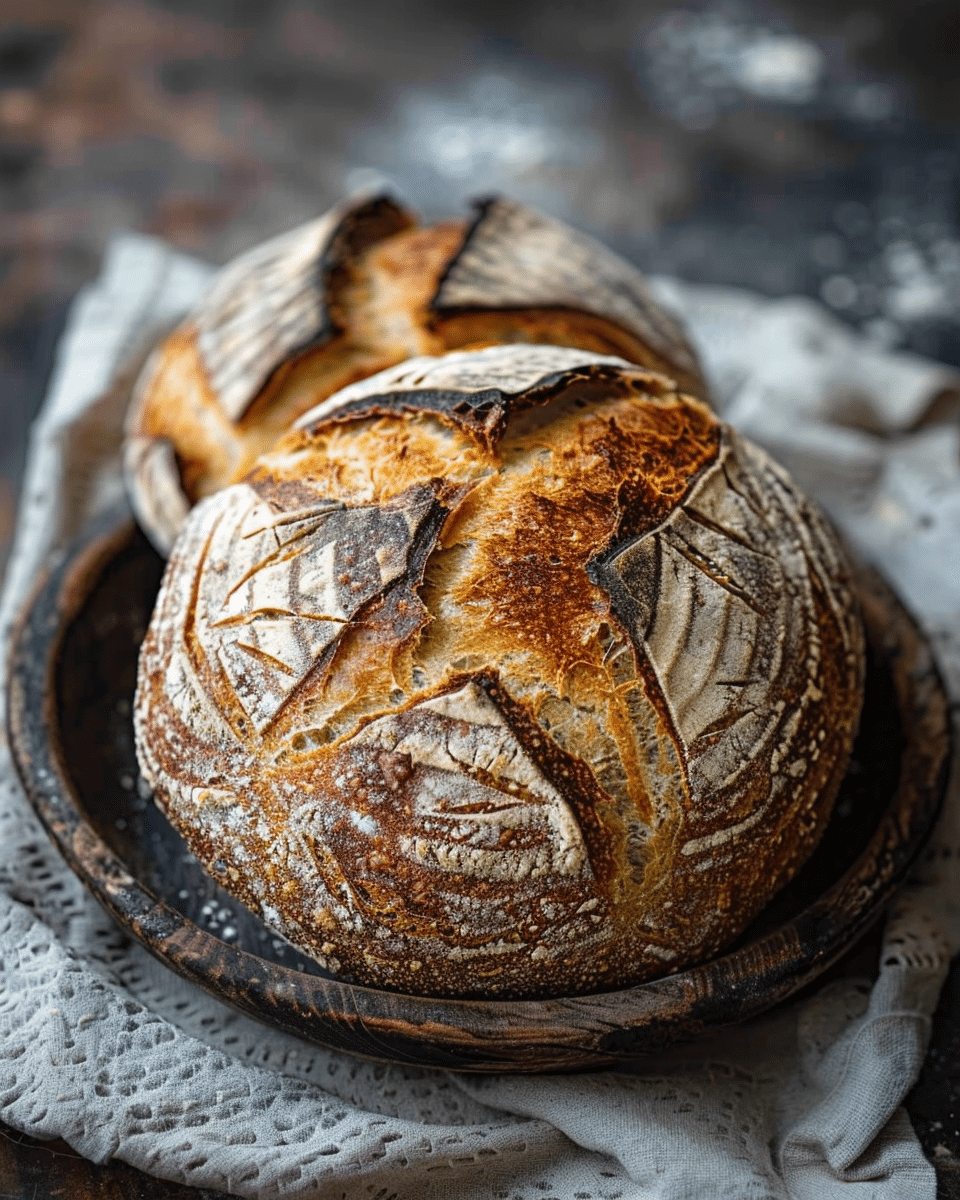
This homemade artisan sourdough bread is everything I love about real bread: crusty on the outside, chewy and airy on the inside, and full of complex, tangy flavor. Naturally fermented using just three ingredients plus an active sourdough starter, it’s a rewarding process that brings the flavor and feel of a rustic bakery loaf straight into my kitchen. The long fermentation makes it easier to digest and adds layers of depth you just can’t get from store-bought bread.
Why You’ll Love This Recipe
I love how this sourdough bread recipe turns a handful of simple ingredients into something magical. It’s a slow process, but I find it meditative and deeply satisfying. Whether I’m baking for my family or prepping a loaf for the weekend, the results are always impressive. The crust crackles, the interior has that perfect open crumb, and the sour tang is balanced and nuanced. Plus, there’s no commercial yeast involved — just wild fermentation at its best.
Ingredients
(Tip: You’ll find the full list of ingredients and measurements in the recipe card below.)
500g bread flour (about 4 cups)
375g water (about 1 ½ cups plus 1 tbsp), room temperature
100g active sourdough starter (about ½ cup)
10g salt (about 2 tsp)
Directions
I start by mixing the flour and water in a large bowl until just combined. Then, I let it rest for an hour — this autolyse stage helps hydrate the flour and begins gluten development.
Next, I add my active sourdough starter and salt, mixing everything by hand until fully incorporated.
Over the next 3 to 4 hours, I perform a series of stretch and folds every 30 minutes. I cover the dough with a damp towel in between to keep it moist.
After the final fold, I let the dough rest at room temperature for 4 to 8 hours, until it doubles in size and looks bubbly and alive.
Once fermented, I gently turn the dough onto a floured surface, shape it into a round or oval depending on my baking vessel, and transfer it into a well-floured proofing basket or a towel-lined bowl.
I cover the dough and place it in the fridge overnight (8 to 12 hours) for cold proofing, which deepens the flavor and helps with oven spring.
The next day, I preheat my oven to 475°F (245°C) with my Dutch oven inside for at least 30 minutes.
I carefully turn the dough onto parchment paper, score the top with a sharp blade, and place it into the hot Dutch oven.
I bake it covered for 20 minutes, then uncover and bake for another 25 to 30 minutes, until it’s deeply golden and crusty.
I always let the loaf cool completely on a wire rack before slicing to let the interior set properly.
Servings and timing
Servings: 12 slices
Prep time: 1 hour (plus overnight proofing)
Cooking time: 50 minutes
Total time: 13–16 hours (with fermentation)
Calories per slice: 180 kcal
Variations
When I want to switch things up, I sometimes use whole wheat flour for up to 20% of the total flour to give the bread a heartier flavor. I’ve also added seeds like sesame or sunflower to the dough during shaping for a nutty crunch. For an herby twist, folding in chopped rosemary or thyme makes for a great savory loaf. The base recipe is incredibly flexible.
Storage/Reheating
Once baked and cooled, I store the sourdough bread at room temperature in a bread bag or wrapped in a clean kitchen towel for up to 3 days. For longer storage, I slice the loaf and freeze it in a zip-top bag — this makes it easy to reheat individual slices in the toaster or oven. If I’m reheating a full loaf, I wrap it in foil and warm it in a 350°F (175°C) oven for 10–15 minutes.
Related Recipes:
- Dutch Oven Sourdough Bread
- Easy Roasted Garlic and Rosemary Sourdough Bread
- Sourdough Pumpkin Muffins
FAQs
What kind of flour works best for sourdough bread?
I prefer bread flour because of its higher protein content, which gives the dough great structure and rise. However, all-purpose flour can work in a pinch, though the crumb may be slightly less open.
Why is my sourdough bread not rising properly?
This usually happens when my starter isn’t active enough. I make sure to feed it regularly and only use it when it’s bubbly and doubled in volume. Cold room temperatures can also slow fermentation.
Can I make this without a Dutch oven?
Yes, but the crust may not be as crisp. I can bake it on a baking stone or sheet with a pan of water on the bottom rack to create steam, which helps mimic the Dutch oven environment.
How do I know when the bread is fully baked?
I look for a deep golden crust and a hollow sound when I tap the bottom of the loaf. For extra precision, I check the internal temperature — it should be around 200–210°F (93–99°C).
Can I skip the overnight proof?
Technically yes, but I find that the cold overnight proof gives the bread a better flavor and structure. If I’m in a hurry, I let it rise at room temperature for 2–4 hours, but the results won’t be quite the same.
Conclusion
This homemade artisan sourdough bread is more than just a recipe — it’s a process I’ve come to love. Every loaf feels like an accomplishment, and I enjoy knowing exactly what goes into my bread. Whether I’m sharing it with friends or savoring a slice on my own, this naturally fermented bread always delivers on flavor, texture, and satisfaction. Once I started baking sourdough at home, there was no turning back.
📖 Recipe:
Print
Homemade Artisan Sourdough Bread
5 Stars 4 Stars 3 Stars 2 Stars 1 Star
No reviews
- Author: Isabella
- Total Time: 13–16 hours
- Yield: 1 loaf (about 12 slices)
- Diet: Vegan
Description
This homemade artisan sourdough bread is crusty on the outside, airy and chewy inside, and full of complex, tangy flavor thanks to natural fermentation with just flour, water, salt, and an active sourdough starter.
Ingredients
500g bread flour (about 4 cups)
375g water (about 1 ½ cups plus 1 tbsp), room temperature
100g active sourdough starter (about ½ cup)
10g salt (about 2 tsp)
Instructions
- In a large bowl, mix the bread flour and water until just combined. Let it rest for 1 hour (autolyse stage).
- Add the active sourdough starter and salt, and mix by hand until fully incorporated.
- Over the next 3 to 4 hours, perform stretch and folds every 30 minutes, covering the dough with a damp towel in between.
- Let the dough rest at room temperature for 4 to 8 hours until it doubles in size and looks bubbly.
- Turn the dough onto a floured surface, shape into a round or oval, and place into a floured proofing basket or towel-lined bowl.
- Cover and refrigerate overnight (8 to 12 hours) for cold proofing.
- The next day, preheat the oven to 475°F (245°C) with a Dutch oven inside for at least 30 minutes.
- Turn the dough onto parchment paper, score the top, and carefully transfer into the hot Dutch oven.
- Bake covered for 20 minutes, then uncover and bake for 25 to 30 minutes until deeply golden and crusty.
- Cool the bread completely on a wire rack before slicing.
Notes
You can substitute up to 20% of the bread flour with whole wheat flour for a heartier loaf.
Try adding sesame or sunflower seeds during shaping for added texture.
For a savory version, fold in chopped herbs like rosemary or thyme.
Always ensure your sourdough starter is active and bubbly before using.
- Prep Time: 1 hour (plus overnight proofing)
- Cook Time: 50 minutes
- Category: Bread
- Method: Baking
- Cuisine: Rustic
Nutrition
- Serving Size: 1 slice
- Calories: 180
- Sugar: 0g
- Sodium: 160mg
- Fat: 0.5g
- Saturated Fat: 0g
- Unsaturated Fat: 0.5g
- Trans Fat: 0g
- Carbohydrates: 37g
- Fiber: 1g
- Protein: 6g
- Cholesterol: 0mg


