Mini Banana Cheesecakes with Nilla Wafer Crust

Isabella

🌟Life, Love, and Gastronomy 🍷

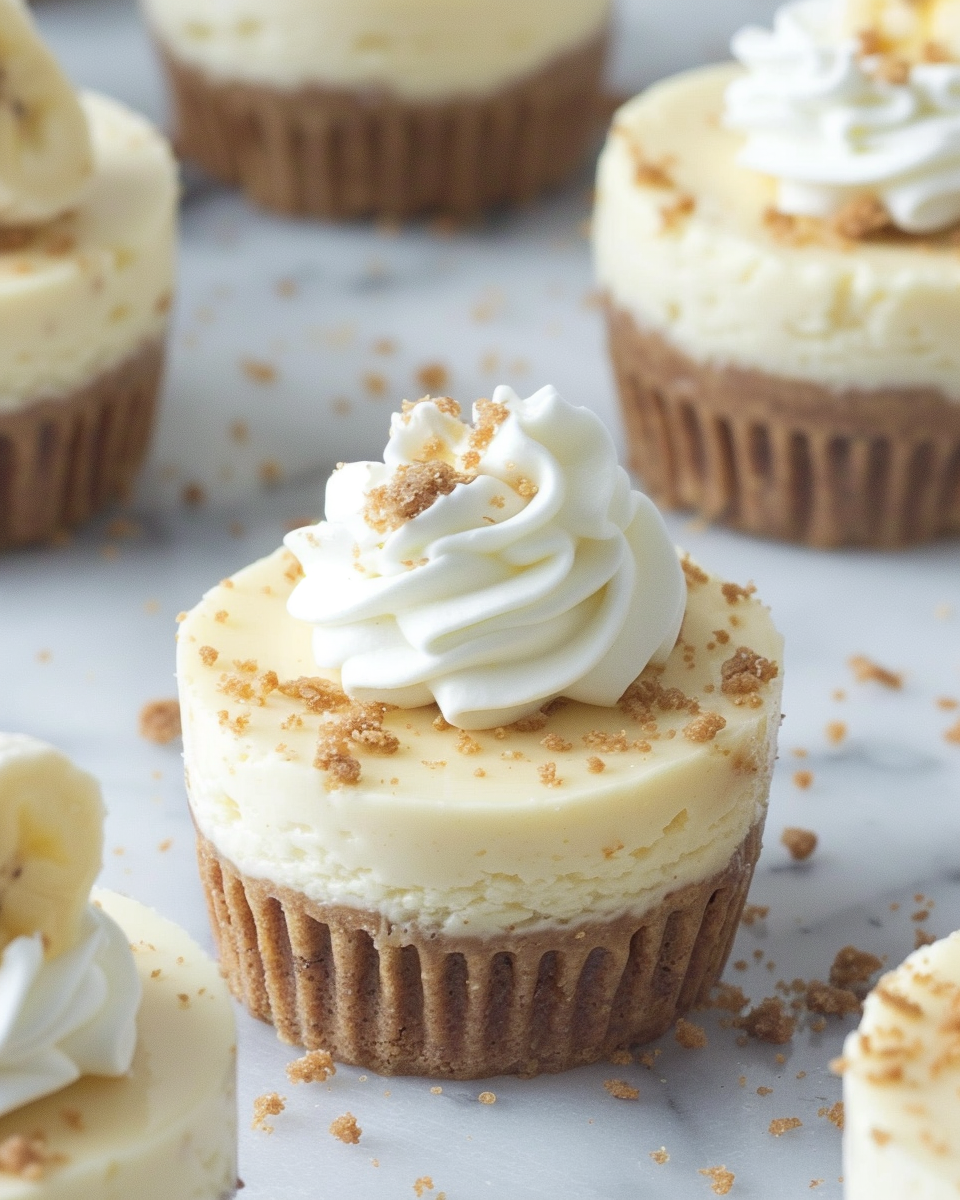
Looking for a bite-sized dessert that packs a tropical punch? These Mini Banana Cheesecakes with Nilla Wafer Crust are a perfect choice. Featuring a buttery, crumbly crust, a smooth banana-flavored cheesecake filling, and a dollop of whipped cream, these mini cheesecakes offer the ideal blend of sweetness and texture in every bite.

Ingredients:

1 cup crushed Nilla wafers

2 tbsp granulated sugar

3 tbsp unsalted butter, melted

8 oz cream cheese, softened

1/4 cup granulated sugar

1 large egg

1 ripe banana, mashed

1/2 tsp vanilla extract

Whipped cream for topping

Banana slices for garnish (optional)

Instructions:

Preheat and Prep:

Start by preheating your oven to 350°F (175°C) and lining a muffin tin with paper liners. This will prevent sticking and make it easy to remove the mini cheesecakes later.

Make the Crust:

In a small bowl, mix crushed Nilla wafers, 2 tbsp sugar, and melted butter until everything is well combined. Press about 1 tablespoon of the mixture into the bottom of each muffin liner to create a crust. Set aside.

Prepare the Cheesecake Filling:

In a large mixing bowl, beat softened cream cheese and 1/4 cup sugar until smooth and creamy. Add the egg, mashed banana, and vanilla extract, and mix until well combined.

Assemble:

Spoon the banana cheesecake mixture over the prepared crusts, filling each cup nearly to the top.

Bake:

Place the muffin tin in the oven and bake for 18-20 minutes or until the centers are set but still slightly jiggly. Remove from the oven and allow the mini cheesecakes to cool completely. Once cool, refrigerate for at least 2 hours to allow the flavors to set.

Serve and Garnish:

Before serving, top each mini cheesecake with whipped cream and, if desired, garnish with banana slices for a fresh finish.

Serving Tips:

Chill Before Serving:

Make sure to refrigerate the mini cheesecakes for at least 2 hours to allow them to fully set. Chilling helps develop the flavors and gives the cheesecakes a firm, creamy texture.

Whipped Cream & Garnish:

For the best presentation, add whipped cream and garnish with banana slices just before serving. This prevents the whipped cream from deflating and keeps the banana slices from browning.

Serving Size:

Since these cheesecakes are bite-sized, plan on serving 1-2 per person. They make a great addition to dessert tables or as part of a larger dessert spread.

Pairings:

These mini cheesecakes pair well with a cup of coffee or tea. You can also serve them with a side of fresh fruit like strawberries, kiwi, or pineapple for a refreshing contrast to the creamy cheesecake.

Storage Tips:

Refrigeration:

Store the mini cheesecakes in an airtight container in the refrigerator for up to 3-4 days. Make sure they are fully covered to prevent them from absorbing any fridge odors.

Freezing:

These mini cheesecakes can be frozen for longer storage. After baking and cooling, place them in a single layer on a baking sheet and freeze until solid (about 1-2 hours). Then, transfer them to an airtight container or freezer bag, separating layers with parchment paper. They can be frozen for up to 2 months.

Thawing: When ready to serve, thaw the cheesecakes in the refrigerator overnight, and add whipped cream and garnish before serving.

Avoid Freezing Garnish:

Don’t freeze the whipped cream or banana slices. Add those after thawing to maintain their freshness and presentation.

Related Recipes:

FAQs:

Can I use a different fruit instead of banana in the cheesecake filling?

Yes, you can substitute the banana with other soft fruits like strawberries, blueberries, or even pureed mango for a different flavor profile. Just make sure the fruit is mashed or pureed smoothly to blend well into the cheesecake mixture.

Can I make these mini cheesecakes without a muffin tin?

If you don’t have a muffin tin, you can use silicone molds or mini ramekins for individual servings. However, using paper liners in a muffin tin helps with easy removal and a neat presentation.

How do I keep the banana slices used for garnish from turning brown?

To prevent browning, you can brush the banana slices with a bit of lemon juice before placing them on top of the cheesecakes. This will help keep them looking fresh for longer.

What can I use if I don’t have Nilla wafers for the crust?

You can substitute the Nilla wafers with graham crackers, digestive biscuits, or even Oreo crumbs for a different but equally delicious crust. The process for making the crust remains the same.

Conclusion:

With their delicious flavor and charming presentation, these Mini Banana Cheesecakes with Nilla Wafer Crust are the perfect sweet treat for any occasion. Whether you’re serving them at a party or enjoying them at home, they’re guaranteed to impress. Happy baking!


📖 Recipe:

Print
clock clock iconcutlery cutlery iconflag flag iconfolder folder iconinstagram instagram iconpinterest pinterest iconfacebook facebook iconprint print iconsquares squares iconheart heart iconheart solid heart solid icon

Mini Banana Cheesecakes with Nilla Wafer Crust


  • Author: Isabella
  • Total Time: 35 minutes
  • Yield: 12 mini cheesecakes
  • Diet: Vegetarian

Description

These Mini Banana Cheesecakes with Nilla Wafer Crust are a bite-sized tropical treat that blends a buttery Nilla wafer crust with creamy banana-flavored cheesecake filling. Topped with whipped cream and optional banana slices, these mini cheesecakes are perfect for parties, potlucks, or an after-dinner dessert. With a prep time of only 15 minutes, they’re an easy yet impressive dessert.


Ingredients

1 cup crushed Nilla wafers

2 tbsp granulated sugar

3 tbsp unsalted butter, melted

8 oz cream cheese, softened

1/4 cup granulated sugar

1 large egg

1 ripe banana, mashed

1/2 tsp vanilla extract

Whipped cream for topping

Banana slices for garnish (optional)


Instructions

  1. Preheat your oven to 350°F (175°C) and line a muffin tin with paper liners.
  2. In a small bowl, combine the crushed Nilla wafers, 2 tbsp sugar, and melted butter. Press about 1 tablespoon of the mixture into the bottom of each muffin liner to form the crust.
  3. In a large bowl, beat the softened cream cheese and 1/4 cup sugar until smooth. Add in the egg, mashed banana, and vanilla extract, and mix until well combined.
  4. Spoon the cheesecake mixture over the prepared crusts, filling each liner almost to the top.
  5. Bake for 18-20 minutes or until the centers are set but slightly jiggly.
  6. Allow the cheesecakes to cool completely, then refrigerate for at least 2 hours.
  7. Before serving, top with whipped cream and garnish with banana slices if desired.

Notes

Be sure to refrigerate the mini cheesecakes for at least 2 hours to allow them to set properly.

You can substitute Nilla wafers with graham crackers or Oreo crumbs for a different crust flavor.

The cheesecakes can be made a day in advance and stored in the fridge until ready to serve.

  • Prep Time: 15 minutes
  • Cook Time: 20 minutes
  • Category: Dessert
  • Method: Baking
  • Cuisine: American

Nutrition

  • Serving Size: 12 mini cheesecakes
  • Calories: 180 kcal

Keywords: Mini banana cheesecakes, banana cheesecake recipe, Nilla wafer crust, mini cheesecakes, bite-sized desserts, easy banana desserts, mini banana cheesecake cupcakes

Leave a Comment

Recipe rating