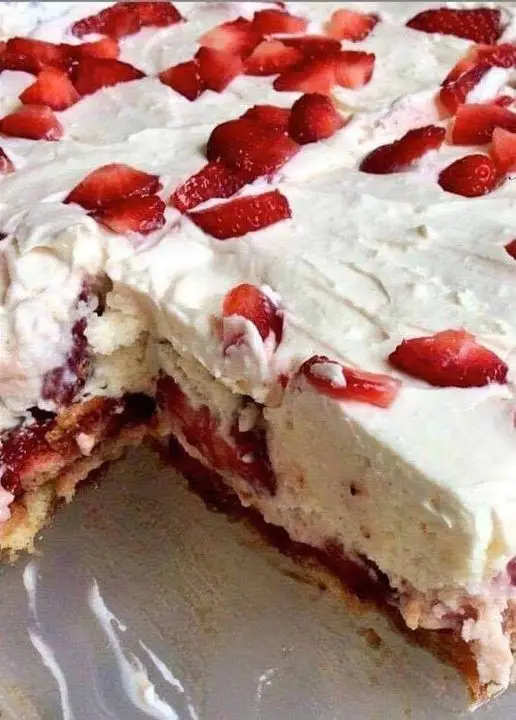
When it comes to satisfying sweet cravings without the fuss of baking, nothing beats a classic no-bake dessert. Our No Bake Strawberry Shortcake recipe offers a delightful twist on the traditional shortcake, blending the irresistible flavors of juicy strawberries, creamy pudding, and fluffy whipped cream. Perfect for any occasion, this recipe is a breeze to whip up and will leave your taste buds singing with joy. Let’s dive into the simple steps to create this heavenly treat!
Ingredients:
1 box of vanilla instant pudding
1/2 cup strawberry juice
1 1/2 cups nonfat milk
1 tsp vanilla extract
24 Lady Fingers
220 g (about 1 cup) Whipped cream, chilled
1 pound fresh strawberries, hulled, sliced, and patted dry
Instructions:
Prepare the Pudding Mixture: In a mixing bowl, whisk together the vanilla instant pudding, nonfat milk, and vanilla extract until well combined. Set aside this luscious pudding mixture.
Whip the Cream: Using a hand mixer or the bowl of a stand mixer, whip the chilled whipped cream until it forms stiff peaks. This fluffy cloud of creaminess will add a luxurious texture to our shortcake.
Layer the Ladyfingers: Dip each ladyfinger briefly into the strawberry juice, allowing them to soak up the fruity flavor. Arrange the soaked ladyfingers in a single layer at the bottom of a dish, creating a sturdy foundation for our shortcake.
Spread the Pudding: Once the ladyfingers are in place, spread half of the prepared pudding mixture evenly over them. This creamy layer will infuse each bite with rich vanilla goodness.
Add the Strawberries: Now, it’s time to adorn our shortcake with slices of fresh strawberries. Arrange the strawberry slices in a single layer over the pudding, ensuring that every spoonful bursts with fruity sweetness.
Repeat the Layers: Repeat the layering process by adding another layer of dipped ladyfingers, followed by the remaining pudding mixture and sliced strawberries. This symphony of flavors will tantalize your taste buds with each bite.
Top with Whipped Cream: Generously dollop the whipped cream over the final layer of strawberries, creating a pillowy blanket of decadence. This dreamy topping adds the perfect finishing touch to our strawberry shortcake masterpiece.
Chill and Serve: Cover the dish with plastic wrap and chill the strawberry shortcake in the refrigerator for at least 4 hours, allowing the flavors to meld together and the dessert to set perfectly. When ready to serve, garnish with additional strawberry slices for a stunning presentation.
Related Recipes:
- No Bake Strawberry Cheesecake Lasagna
- Big Boy’s Fresh Strawberry Pie
- Best Bread Pudding with Vanilla Sauce Recipe
Serving Tips:
- Garnish with Fresh Mint: Before serving, add a pop of color and flavor by garnishing the strawberry shortcake with fresh mint leaves. The vibrant green leaves will complement the red strawberries beautifully.
- Drizzle with Strawberry Sauce: For an extra burst of strawberry goodness, drizzle a bit of strawberry sauce over each serving just before serving. This will intensify the fruity flavor and add a decorative touch to the dessert.
- Serve Chilled: Ensure that the strawberry shortcake is served chilled for the best taste and texture. The cool temperature enhances the refreshing quality of the dessert, making it even more enjoyable, especially on a hot day.
- Individual Servings: Consider assembling the strawberry shortcake in individual serving glasses or bowls for a stylish presentation. This allows guests to enjoy their own portion without the need for slicing, making it perfect for parties or gatherings.
- Pair with Coffee or Tea: Serve the strawberry shortcake alongside a cup of freshly brewed coffee or fragrant tea to complement its sweetness. The contrast of flavors will elevate the dessert experience and leave guests feeling satisfied and indulged.
Storage Tips:
- Refrigerate: Store any leftover strawberry shortcake covered in the refrigerator to maintain its freshness. Properly stored, it can last for up to 2-3 days, although it’s best enjoyed within the first day or two for optimal flavor and texture.
- Cover Well: To prevent the whipped cream from absorbing any unwanted odors or flavors from the fridge, cover the strawberry shortcake tightly with plastic wrap or an airtight lid before refrigerating.
- Avoid Freezing: While it’s possible to freeze leftover strawberry shortcake, it’s not recommended due to the delicate texture of the whipped cream and fresh strawberries. Freezing can cause the dessert to become soggy and lose its appeal upon thawing.
- Serve Chilled: When ready to enjoy leftovers, simply remove the strawberry shortcake from the refrigerator and allow it to sit at room temperature for a few minutes to slightly soften before serving. This ensures that the flavors meld together harmoniously and the dessert is at its most delectable state.
Conclusion:
With its effortless preparation and irresistible flavors, our No Bake Strawberry Shortcake recipe is sure to become a beloved favorite in your dessert repertoire. Whether enjoyed as a sweet ending to a family dinner or shared at a festive gathering, this delightful treat promises to leave a lasting impression. Indulge in every blissful bite and savor the magic of summer’s finest strawberries in every spoonful.
📖 Recipe
Print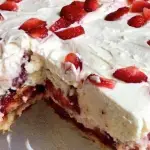
No Bake Strawberry Shortcake
- Total Time: 4 hours 20 minutes
- Yield: Serves 8
- Diet: Vegetarian
Description
Experience the luscious flavors of our No Bake Strawberry Shortcake recipe! This delectable dessert features layers of vanilla pudding, fresh strawberries, and fluffy whipped cream, all nestled between delicate ladyfingers. Perfect for any occasion, this easy-to-make treat requires no baking and promises to satisfy your sweet tooth in no time. Try our No Bake Strawberry Shortcake today for a delightful dessert experience that’s sure to impress!
Ingredients
1 box of vanilla instant pudding
1/2 cup strawberry juice
1 1/2 cups nonfat milk
1 tsp vanilla extract
24 Lady Fingers
220 g (about 1 cup) Whipped cream, chilled
1 pound fresh strawberries, hulled, sliced, and patted dry
Instructions
- Prepare the Pudding Mixture: In a mixing bowl, whisk together the vanilla instant pudding, nonfat milk, and vanilla extract until well combined. Set aside this luscious pudding mixture.
- Whip the Cream: Using a hand mixer or the bowl of a stand mixer, whip the chilled whipped cream until it forms stiff peaks. This fluffy cloud of creaminess will add a luxurious texture to our shortcake.
- Layer the Ladyfingers: Dip each ladyfinger briefly into the strawberry juice, allowing them to soak up the fruity flavor. Arrange the soaked ladyfingers in a single layer at the bottom of a dish, creating a sturdy foundation for our shortcake.
- Spread the Pudding: Once the ladyfingers are in place, spread half of the prepared pudding mixture evenly over them. This creamy layer will infuse each bite with rich vanilla goodness.
- Add the Strawberries: Now, it’s time to adorn our shortcake with slices of fresh strawberries. Arrange the strawberry slices in a single layer over the pudding, ensuring that every spoonful bursts with fruity sweetness.
- Repeat the Layers: Repeat the layering process by adding another layer of dipped ladyfingers, followed by the remaining pudding mixture and sliced strawberries. This symphony of flavors will tantalize your taste buds with each bite.
- Top with Whipped Cream: Generously dollop the whipped cream over the final layer of strawberries, creating a pillowy blanket of decadence. This dreamy topping adds the perfect finishing touch to our strawberry shortcake masterpiece.
- Chill and Serve: Cover the dish with plastic wrap and chill the strawberry shortcake in the refrigerator for at least 4 hours, allowing the flavors to meld together and the dessert to set perfectly. When ready to serve, garnish with additional strawberry slices for a stunning presentation.
Notes
For best results, ensure the ladyfingers are only briefly dipped in strawberry juice to prevent them from becoming too soggy. Additionally, patting the sliced strawberries dry helps maintain the dessert’s texture
- Prep Time: 20 minutes
- Cook Time: 4 hours
- Category: Desserts
- Method: No-Bake
- Cuisine: American


