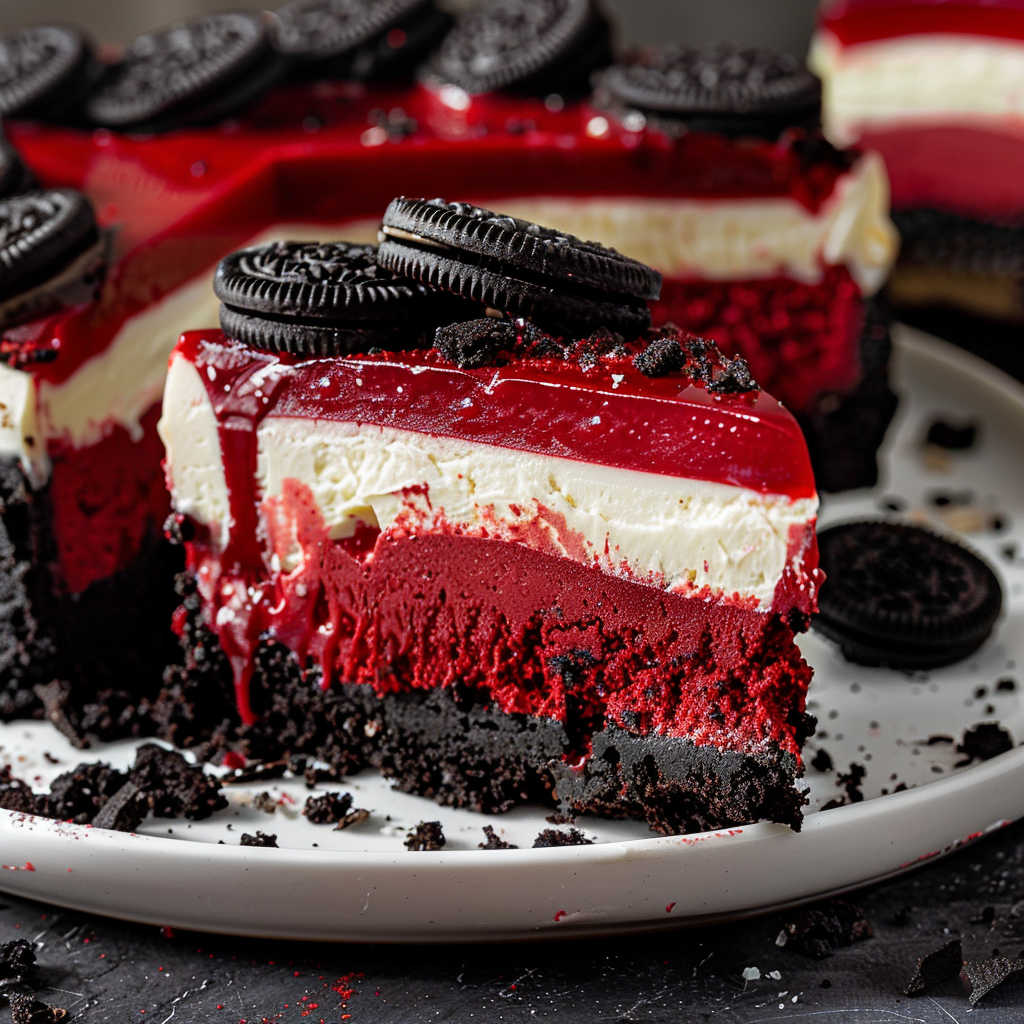
If you’re in the mood for an exquisite dessert that tantalizes your taste buds and captivates your senses, look no further than this Red Velvet Oreo Cheesecake. Combining the irresistible flavors of red velvet, Oreo, and creamy cheesecake, this dessert is a symphony of sweetness and indulgence. Follow this simple recipe to create a masterpiece that will leave everyone craving for more.
Ingredients:
For the Crust:
2 cups Oreo crumbs
1/2 cup unsalted butter, melted
For the Cheesecake:
3 (8 oz) packages cream cheese, softened
1 cup granulated sugar
3 large eggs
1/4 cup sour cream
2 tsp vanilla extract
2 tbsp cocoa powder
1 tbsp red food coloring
1 cup crushed Oreos
For the Topping:
Whipped cream
Whole Oreos
Red velvet crumbs
Directions:
Prepare the Crust: Preheat your oven to 350°F (175°C). Mix Oreo crumbs with melted butter and press into the bottom of a springform pan. Chill while preparing the filling.
Make the Cheesecake Filling: In a mixing bowl, beat cream cheese and sugar until smooth. Add eggs one at a time, then mix in sour cream, vanilla extract, cocoa powder, and red food coloring until well combined.
Add the Oreos: Gently fold in the crushed Oreos into the cheesecake mixture, ensuring they are evenly distributed.
Assemble and Bake: Pour the cheesecake mixture over the chilled crust and smooth the top. Bake for 55-60 minutes or until set but slightly wobbly in the center. Allow the cheesecake to cool completely, then refrigerate for at least 4 hours to set.
Decorate and Serve: Prior to serving, decorate the cheesecake with whipped cream, whole Oreos, and red velvet crumbs for an extra touch of elegance and flavor.
Nutritional Information:
Prep Time: 20 minutes
Cook Time: 60 minutes
Calories: Approximately 560 per slice
Related Recipes:
- Oreo Cheesecake Tacos Recipe
- EASY FRIED CHEESE BITES
- Grimace Shake Recipe
- What’s in the Grimace Birthday Shake?
Serving Tips:
Chill Before Serving: For the best taste and texture, allow the cheesecake to chill in the refrigerator for at least 4 hours before serving. This helps it set properly and enhances the flavors.
Garnish Creatively: When decorating the cheesecake, let your creativity shine! Use whipped cream, whole Oreos, and red velvet crumbs to create visually stunning patterns or designs on top of the cheesecake. This not only adds to the presentation but also adds extra flavor and texture.
Slice Carefully: When slicing the cheesecake, use a sharp knife dipped in hot water and wiped dry between each slice. This ensures clean cuts and prevents the cheesecake from sticking to the knife.
Serve with Accompaniments: Elevate the dining experience by serving the cheesecake with additional accompaniments such as fresh berries, chocolate sauce, or a drizzle of caramel.
Storage Tips:
Refrigerate Properly: Store any leftover cheesecake in an airtight container in the refrigerator. It can last for up to 3-4 days, maintaining its freshness and flavor.
Avoid Freezing Toppings: If your cheesecake is topped with whipped cream or delicate decorations, it’s best to remove them before storing leftovers. These toppings don’t freeze well and may become soggy or lose their shape.
Freeze for Longer Storage: If you have a large batch of cheesecake or want to save some for later, you can freeze individual slices. Wrap each slice tightly in plastic wrap and aluminum foil before placing them in a freezer-safe container. Frozen cheesecake can last for up to 1-2 months.
Thaw Before Enjoying: When ready to enjoy frozen cheesecake, transfer it to the refrigerator to thaw overnight. This gradual thawing process helps preserve the texture and prevents any condensation from forming on the surface.
FAQs
Can I use store-bought Oreo crumbs for the crust, or do I have to crush the cookies myself?
While you can certainly use store-bought Oreo crumbs for convenience, crushing the cookies yourself provides a fresher taste and allows you to control the texture of the crust. Simply place whole Oreos in a food processor and pulse until they reach the desired consistency.
Can I substitute another type of food coloring for the red food coloring?
Yes, you can experiment with different types of food coloring to achieve your desired color. However, keep in mind that red food coloring contributes to the vibrant hue characteristic of red velvet desserts. If you choose to use a different color, adjust the quantity accordingly to avoid overpowering the other flavors.
How do I prevent cracks from forming on the surface of the cheesecake?
To minimize the risk of cracks, avoid overmixing the cheesecake batter once the eggs have been added. Additionally, baking the cheesecake in a water bath can help regulate the temperature and create a moist environment, reducing the likelihood of cracks. Once the cheesecake is baked, allow it to cool gradually at room temperature before refrigerating.
Can I make this cheesecake in advance for a special occasion?
Absolutely! In fact, making the cheesecake a day or two in advance allows the flavors to meld together and results in a richer taste. Simply prepare the cheesecake as instructed, then cover and refrigerate until ready to serve. Just be sure to add the decorative toppings right before serving to maintain their freshness and appearance.
Conclusion:
Dive into a world of luxury and decadence with this Red Velvet Oreo Cheesecake. With its sumptuous layers of Oreo-infused crust, velvety red velvet cheesecake filling, and lavish toppings, this dessert is guaranteed to impress even the most discerning palate. Whether it’s for a special occasion or a well-deserved indulgence, this cheesecake is sure to be the star of any dessert table. So go ahead, treat yourself to a slice of bliss and savor every delightful bite!
📖 Recipe:
Print
Red Velvet Oreo Cheesecake
- Total Time: 4 hours 20 minutes
- Yield: 10-12 servings
- Diet: Vegetarian
Description
Indulge in a delightful culinary adventure with our mouthwatering Red Velvet Oreo Cheesecake recipe. Combining the decadent flavors of red velvet and Oreo, this dessert is a true crowd-pleaser.
Ingredients
For the Crust:
2 cups Oreo crumbs
1/2 cup melted unsalted butter
For the Cheesecake:
3 (8 oz) packages softened cream cheese
1 cup granulated sugar
3 large eggs
1/4 cup sour cream
2 tsp vanilla extract
2 tbsp cocoa powder
1 tbsp red food coloring
1 cup crushed Oreos
For the Topping:
Whipped cream
Whole Oreos, Red velvet crumbs
Instructions
- Prepare the crust by mixing Oreo crumbs with melted butter and pressing into a springform pan. Chill while preparing the filling.
- Beat cream cheese and sugar until smooth. Add eggs one at a time, then mix in sour cream, vanilla, cocoa powder, and red food coloring.
- Gently fold in crushed Oreos. Pour mixture over the crust and bake at 350°F (175°C) for 55-60 minutes.
- Cool completely, then refrigerate for at least 4 hours. Decorate with whipped cream, Oreos, and red velvet crumbs before serving.
Notes
Ensure cream cheese is softened for a smooth texture.
Use a water bath while baking to prevent cracking.
Decorate just before serving for the freshest presentation
- Prep Time: 20 minutes
- Cook Time: 60 minutes
- Category: Desserts
- Method: Baking
- Cuisine: American


