

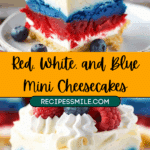
Looking for the perfect dessert to brighten up your patriotic celebrations? These Red, White, and Blue Mini Cheesecakes are not only a visual treat but also a deliciously creamy delight that will impress your guests. With their colorful layers and rich flavor, they are ideal for any event where you want to add a touch of festive flair.
Ingredients:
Crust:
1 cup vanilla wafer cookie crumbs
2 tbsp sugar
4 tbsp butter, melted
Filling:
12 oz cream cheese, room temperature
1/2 cup sugar
3 tbsp flour
1/2 cup sour cream
1 1/2 tsp vanilla extract
2 eggs
Blue gel icing color
Red gel icing color
Topping:
1/2 cup heavy whipping cream, cold
5 tbsp powdered sugar
1/2 tsp vanilla extract
Sprinkles
Directions:
Preheat and Prepare: Begin by preheating your oven to 325°F (163°C). Line a cupcake pan with liners to prepare for the mini cheesecakes.
Make the Crust: In a medium bowl, mix together the vanilla wafer crumbs, sugar, and melted butter until well combined. Press this mixture firmly into the bottoms of the cupcake liners. Bake the crusts for 5 minutes, then let them cool. Reduce the oven temperature to 300°F (149°C).
Prepare the Filling: In a large bowl, beat together the cream cheese, sugar, and flour until smooth. Add the sour cream and vanilla extract, mixing until well combined. Incorporate the eggs one at a time, beating well after each addition.
Color the Batter: Divide the batter evenly into three bowls. Color one portion with blue gel icing color, one with red gel icing color, and leave the third portion plain.
Layer the Batter: Spoon the different colored batters into the prepared crusts, layering them as desired. Bake the mini cheesecakes for 18-20 minutes, or until the centers are set. Allow them to cool completely.
Add the Topping: In a separate bowl, whip the heavy cream, powdered sugar, and vanilla extract until stiff peaks form. Pipe this whipped cream onto the cooled mini cheesecakes and garnish with sprinkles.
Serving Tips:
Chill Before Serving: For the best texture and flavor, refrigerate the mini cheesecakes for at least 2 hours before serving. This will allow them to set properly and enhance their creamy consistency.
Garnish Just Before Serving: Add the whipped cream and sprinkles just before serving to maintain their freshness and appearance. This will prevent the toppings from becoming soggy or losing their appeal.
Use a Cookie Scoop: For even distribution of the batter and to ensure that each mini cheesecake is filled uniformly, use a small cookie scoop or spoon.
Serve on a Platter: Arrange the mini cheesecakes on a decorative platter for a festive presentation. You can also add some extra sprinkles or fresh berries around the cheesecakes for added color and flair.
Storage Tips:
Refrigeration: Store any leftover mini cheesecakes in an airtight container in the refrigerator. They will keep well for up to 5 days. Ensure they are covered to prevent them from absorbing any other odors in the fridge.
Freezing: If you want to store the mini cheesecakes for a longer period, you can freeze them. Place the cooled cheesecakes on a baking sheet and freeze until solid. Once frozen, transfer them to an airtight container or freezer bag. They can be frozen for up to 2 months. To thaw, transfer them to the refrigerator for several hours or overnight.
Avoid Freezing Toppings: It’s best to freeze the mini cheesecakes without the whipped cream and sprinkles. Add these toppings fresh when you are ready to serve.
Thawing: If you’ve frozen the cheesecakes, let them thaw in the refrigerator for several hours before serving. This will ensure they thaw evenly and maintain their creamy texture.
Related Recipes:
FAQs:
Conclusion:
These Red, White, and Blue Mini Cheesecakes are not only perfect for celebrating patriotic holidays like the Fourth of July, but they also make a delightful addition to any summer gathering. The creamy texture and vibrant layers make these cheesecakes a standout dessert that’s as tasty as it is visually appealing. Enjoy the festive flavors and impress your guests with this delicious and easy-to-make treat!
📖 Recipe:
Print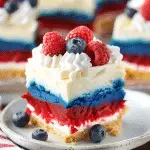
Red, White, and Blue Mini Cheesecakes
- Total Time: 40 minutes
- Yield: 12-14 mini cheesecakes
Description
These Red, White, and Blue Mini Cheesecakes are the perfect festive dessert for any patriotic celebration. With their smooth, creamy texture and vibrant, colorful layers, these mini cheesecakes are a delightful treat that’s both visually stunning and delicious. Easy to make and even easier to enjoy, they offer a classic cheesecake flavor with a fun, festive twist. Ideal for holidays like the Fourth of July or Memorial Day, these mini cheesecakes will be a hit at your next gathering.
Ingredients
Crust:
1 cup vanilla wafer cookie crumbs
2 tbsp sugar
4 tbsp butter, melted
Filling:
12 oz cream cheese, room temperature
1/2 cup sugar
3 tbsp flour
1/2 cup sour cream
1 1/2 tsp vanilla extract
2 eggs
Blue gel icing color
Red gel icing color
Topping:
1/2 cup heavy whipping cream, cold
5 tbsp powdered sugar
1/2 tsp vanilla extract
Sprinkles
Instructions
- Preheat the oven to 325°F (163°C) and line a cupcake pan with liners.
- Mix vanilla wafer crumbs, sugar, and melted butter. Press into the bottoms of the liners.
- Bake crusts for 5 minutes and cool. Reduce oven temperature to 300°F (149°C).
- Beat cream cheese, sugar, and flour until smooth. Add sour cream and vanilla. Beat in eggs one at a time.
- Divide batter into three bowls. Color one portion red, one blue, and leave one plain.
- Layer batters into liners. Bake for 18-20 minutes. Cool completely.
- Whip heavy cream, powdered sugar, and vanilla extract to stiff peaks. Pipe onto cheesecakes and add sprinkles.
Notes
Chill the mini cheesecakes in the refrigerator for at least 2 hours before serving for best results.
Add whipped cream and sprinkles just before serving to keep them fresh.
You can freeze the mini cheesecakes without toppings for up to 2 months. Thaw in the refrigerator before serving.
- Prep Time: 20 minutes
- Cook Time: 20 minutes
- Category: Dessert
- Method: Baking
- Cuisine: American
Nutrition
- Serving Size: 12-14 mini cheesecakes
- Calories: 196 kcal per serving


