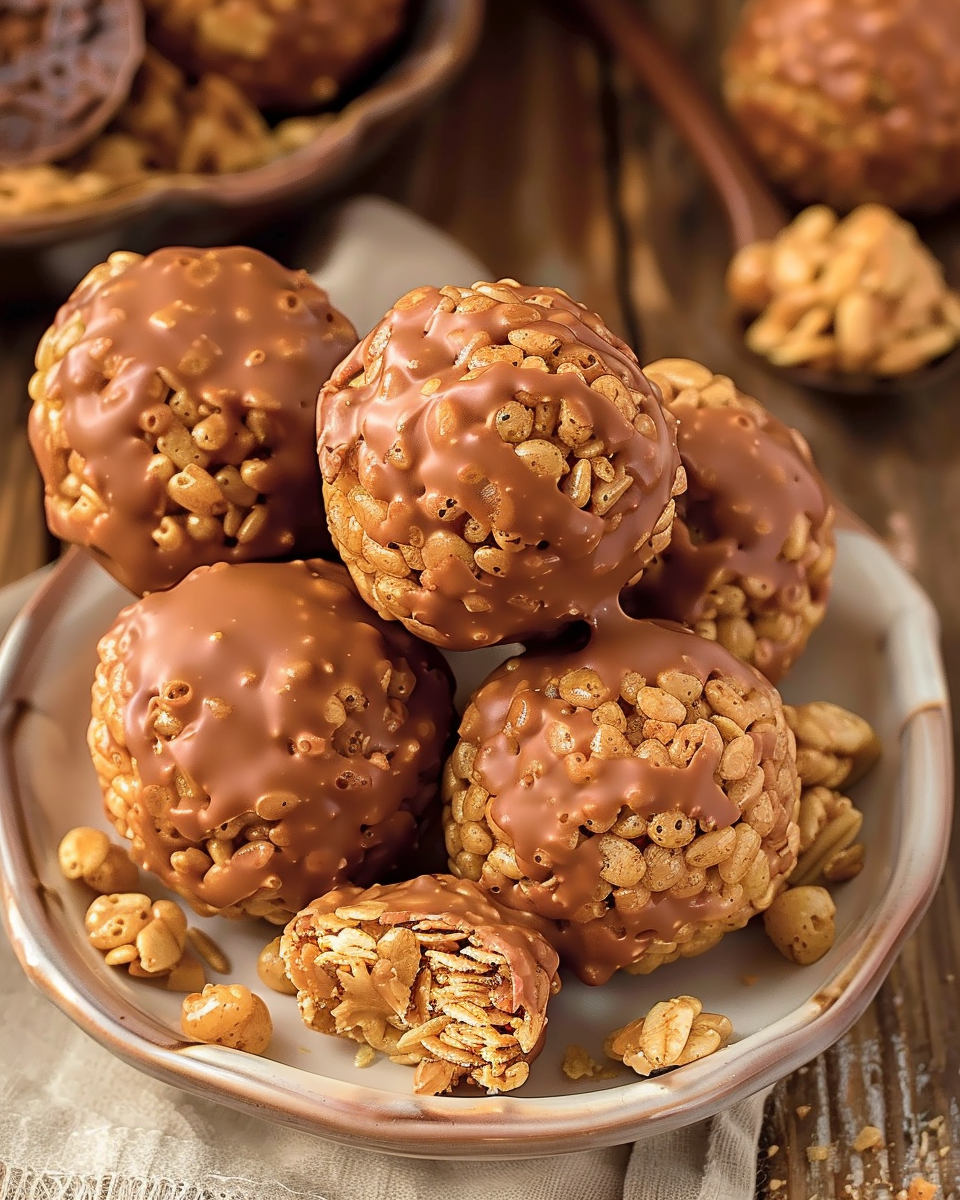
Are you searching for a quick, no-bake dessert that effortlessly combines crunchy, sweet, and salty flavors? Look no further than these mouth-watering Rice Krispie Peanut Butter Balls! Perfect for snack time, parties, or as a delightful treat just for yourself, these balls are not only easy to make but are a guaranteed crowd-pleaser. Here’s how you can whip up these delectable treats in no time.
Ingredients for Your No-Bake Peanut Butter Balls
To get started, you will need a few simple ingredients:
- 2 cups Rice Krispies cereal – for that irresistible crunch.
- 1 cup creamy peanut butter – choose a high-quality brand for the best flavor.
- 1/2 cup powdered sugar – to add a touch of sweetness.
- 2 tablespoons unsalted butter, melted – for a smooth texture.
- 1 cup semi-sweet chocolate chips, melted – for dipping your balls to chocolatey perfection.
- Optional toppings: Sprinkles or crushed peanuts for a fun and festive finish.
Step-by-Step Directions to Make Peanut Butter Balls
- Mix the Base: In a large mixing bowl, combine the Rice Krispies, creamy peanut butter, powdered sugar, and melted butter. Stir the mixture until it is well combined and holds together when pressed.
- Shape the Balls: Scoop out tablespoon-sized portions of the mixture. Using clean hands, roll them into smooth balls and place them on a parchment-lined baking sheet.
- Chill: To firm up the balls, refrigerate them for about 30 minutes.
- Dip in Chocolate: Once chilled, dip each ball into the melted chocolate. Use a fork to ensure even coating, letting any excess chocolate drip off before placing them back on the baking sheet.
- Add Toppings: If using, sprinkle the wet chocolate with decorative sprinkles or crushed peanuts for that extra flair.
- Chill Again: Refrigerate the balls for another 30 minutes, or until the chocolate sets completely.
- Enjoy: Serve these Rice Krispie peanut butter balls chilled or at room temperature. They’re perfect as a sweet treat or a fun dessert at your next gathering.
Related Recipes:
Serving and Storage Tips for Rice Krispie Peanut Butter Balls
Making these Rice Krispie Peanut Butter Balls is only half the fun; serving them creatively and storing them properly ensures they remain delicious and presentable. Here are some tips on how to best serve and store these delightful treats:
Serving Tips:
- Presentation Matters: Arrange the balls on a decorative platter or in mini cupcake liners for a festive touch. This makes them easy to grab and enjoy, especially at parties or gatherings.
- Pair with Beverages: These sweet treats pair wonderfully with various beverages. Serve them with coffee, tea, or milk for a comforting snack. For adults, a dessert wine or a cup of espresso can complement the rich flavors of peanut butter and chocolate.
- Temperature Considerations: While these balls can be served chilled or at room temperature, serving them slightly chilled often enhances their texture, making the chocolate crisp and the peanut butter firm.
Storage Tips:
- Refrigeration: For short-term storage, keep the peanut butter balls in an airtight container in the refrigerator. They will stay fresh for up to a week.
- Freezing for Longevity: If you want to extend their shelf life, these balls freeze exceptionally well. Place them in a single layer on a baking sheet to freeze initially. Once they are solid, transfer them to a freezer-safe bag or container. They can be stored in the freezer for up to 3 months. Thaw them in the refrigerator before serving.
- Avoid Humidity and Heat: Keep them away from direct sunlight and any warm environment to prevent the chocolate from melting and the balls from becoming too soft.
- Layer with Parchment Paper: When storing in containers, layer the balls with parchment paper to prevent them from sticking together. This is especially helpful if you’ve decorated them with toppings like sprinkles or crushed peanuts.
Quick Tips for Refreshing Stored Balls:
- If the chocolate coating looks dull after refrigeration, you can give the balls a little gloss by brushing them lightly with some edible oil or warming them very briefly (a few seconds) in the microwave.
- If they have been in the freezer, let them sit at room temperature for 10-15 minutes before serving to soften slightly, enhancing their texture and flavor.
By following these serving and storage tips, you can ensure your Rice Krispie Peanut Butter Balls remain as enticing and delicious as the day you made them. Enjoy sharing these treats with friends and family or keep them handy for a quick and delightful snack anytime.
FAQs
1. Can I use natural peanut butter in this recipe?
- Yes, you can use natural peanut butter in this recipe. However, keep in mind that natural peanut butter can be more oily and less sweet than regular creamy peanut butter. You may need to adjust the powdered sugar slightly to achieve the desired sweetness and consistency. Stir the natural peanut butter well before using to ensure it’s well mixed.
2. What can I use instead of chocolate chips for dipping?
- If you prefer not to use chocolate chips, there are several alternatives you can explore. White chocolate, dark chocolate, or butterscotch chips can be melted for dipping. You can also use a chocolate almond bark or a candy melt in various colors for a festive look.
3. Are these peanut butter balls gluten-free?
- Rice Krispies cereal traditionally contains malt flavoring, which is derived from barley, a source of gluten. To make gluten-free peanut butter balls, ensure to use a gluten-free puffed rice cereal. Also, double-check that all other ingredients are gluten-free, including the peanut butter and chocolate chips.
4. How can I make these treats vegan?
- To make vegan Rice Krispie Peanut Butter Balls, you’ll need to substitute a few ingredients. Use a vegan butter alternative instead of dairy butter, and choose a vegan chocolate for dipping. Ensure the peanut butter is vegan (most are, but it’s good to check), and use a vegan-friendly marshmallow alternative if adding marshmallows for extra stickiness.
Why These Peanut Butter Balls Are a Must-Try
- No-Bake: Perfect for hot days or when you want a quick treat without turning on the oven.
- Kid-Friendly: Safe and fun for kids to make, these treats are great for involving little ones in the kitchen.
- Customizable: Easy to adapt by adding different toppings or using almond butter for a different twist.
Final Thoughts
These Rice Krispie Peanut Butter Balls are not only delicious but also a versatile treat for any occasion. Whether you’re making them for a party, as a fun project with kids, or just to treat yourself, they’re bound to be a hit. Give this recipe a try and indulge in the sweet, crunchy, and chocolatey goodness of these no-bake delights.
📖 Recipe
Print
Rice Krispie Peanut Butter Balls
- Total Time: 1 hour 15 minutes
- Yield: 20 balls
Description
Indulge in the perfect blend of crunchy, sweet, and salty with these no-bake Rice Krispie Peanut Butter Balls. Ideal for quick snacks, parties, or a simple dessert, this recipe combines simple ingredients like creamy peanut butter and Rice Krispies with melted chocolate for a delightful treat that’s as fun to make as it is to eat.
Ingredients
2 cups Rice Krispies cereal
1 cup creamy peanut butter
1/2 cup powdered sugar
2 tablespoons unsalted butter, melted
1 cup semi-sweet chocolate chips, melted for dipping
Optional: Sprinkles or crushed peanuts for decoration
Instructions
- In a large bowl, mix Rice Krispies, peanut butter, powdered sugar, and melted butter until combined.
- Roll mixture into tablespoon-sized balls and place on a parchment-lined tray.
- Chill in the refrigerator for 30 minutes.
- Dip each ball into melted chocolate, allowing excess to drip off, and return to the tray.
- Optionally, add sprinkles or crushed peanuts while chocolate is still wet.
- Chill for an additional 30 minutes until set.
Notes
Natural peanut butter can be used but may alter consistency; adjust sugar as needed.
For a vegan version, use vegan chocolate and substitute butter with a vegan alternative.
Make sure all ingredients are gluten-free if necessary, especially the cereal.
- Prep Time: 15 minutes
- Cook Time: 1 hour
- Category: Dessert
- Method: No-Bake
- Cuisine: American


