

This Black Forest Cheesecake brings together the bold richness of chocolate and the bright tang of cherries in one unforgettable dessert. With a crunchy chocolate cookie crust, a creamy chocolate cheesecake center, and a glossy cherry topping, it’s a layered indulgence that looks just as impressive as it tastes. Whether I’m serving it for a special occasion or treating myself to something luxurious, this cheesecake always delivers a slice of pure joy.
Why You’ll Love This Recipe
I love how this cheesecake strikes the perfect balance between deep, chocolatey flavor and fruity brightness. The cookie crust adds a pleasant crunch, while the filling is smooth, not overly sweet, and laced with both cocoa and melted dark chocolate. The cherry topping provides a beautiful, tart contrast that elevates the entire dessert. Plus, it’s naturally sweetened and can be made gluten-free or dairy-free if needed, making it feel a little more wholesome without losing any of its decadence.
Ingredients
(Tip: You’ll find the full list of ingredients and measurements in the recipe card below.)
For the crust:
1 ½ cups chocolate cookie crumbs (gluten-free if needed)
¼ cup melted coconut oil or butter
For the cheesecake filling:
2 cups cream cheese, softened
⅔ cup plain Greek yogurt or dairy-free yogurt
¾ cup maple syrup or honey
1 tsp pure vanilla extract
½ tsp almond extract
¼ cup unsweetened cocoa powder
2 tbsp cornstarch or arrowroot
½ cup melted dark chocolate
For the cherry topping:
1 ½ cups frozen or fresh cherries (pitted)
2 tbsp maple syrup
1 tbsp lemon juice
1 tbsp cornstarch mixed with 2 tbsp water
Directions
I preheat the oven to 325°F (160°C) and line the bottom of a 9-inch springform pan with parchment paper.
I mix the chocolate cookie crumbs with melted coconut oil in a bowl, then press the mixture firmly into the bottom of the pan to form the crust. I bake it for 10 minutes and then set it aside.
In a large bowl, I beat the cream cheese until smooth. Then I add the yogurt, maple syrup, vanilla, almond extract, and cocoa powder, mixing until well combined.
I stir in the cornstarch and melted dark chocolate, blending until the batter is creamy and smooth.
I pour the filling over the baked crust, smoothing the top and tapping the pan gently to release air bubbles.
I bake the cheesecake for 45–50 minutes, until the center is set but still slightly jiggly. I then turn off the oven, crack the door, and let the cheesecake sit inside for 1 hour.
I remove the cheesecake and refrigerate it for at least 6 hours or overnight.
For the cherry topping, I heat the cherries, maple syrup, and lemon juice in a saucepan over medium heat until the cherries start to release their juices. I stir in the cornstarch slurry and let it simmer until thickened, then cool it completely.
Just before serving, I spoon the cherry topping over the chilled cheesecake.
Servings and timing
Servings: 10 slices
Prep Time: 20 minutes
Cooking Time: 50 minutes
Total Time: 1 hour 10 minutes + chilling time
Calories per slice: 310 kcal
Variations
I sometimes swap the cherry topping with raspberry or strawberry compote for a different fruity twist.
To make it fully dairy-free, I use dairy-free cream cheese and yogurt options.
For a more intense chocolate flavor, I’ve added mini chocolate chips into the filling before baking.
If I want to save time, I use store-bought cherry pie filling instead of making my own topping.
I’ve even turned this recipe into mini cheesecakes by using a muffin tin with liners—perfect for parties.
Storage/Reheating
I store the cheesecake in the refrigerator, covered, for up to 5 days. It actually tastes even better the next day once all the flavors have melded. If I’m making it ahead, I wait to add the cherry topping until just before serving for the freshest appearance. For longer storage, I freeze slices individually, wrapped tightly in plastic wrap and foil. When I’m ready to enjoy a slice, I let it thaw in the fridge overnight—no reheating needed!
Related Recipes:
FAQs
How do I know when the cheesecake is done baking?
I look for the center to be mostly set but still have a slight jiggle when I gently shake the pan. It continues to set as it cools.
Can I use a different crust besides chocolate cookies?
Yes, I’ve used graham crackers or even crushed almonds for the crust. Chocolate cookies just enhance the Black Forest vibe.
Is it okay to use canned cherries?
I prefer fresh or frozen cherries for the best flavor, but canned cherries (not pie filling) can work if drained and sweetened to taste.
Can I make this cheesecake ahead of time?
Absolutely. I often make it a day ahead—it needs to chill anyway. I just wait to add the cherry topping until I’m ready to serve.
What kind of dark chocolate works best in the filling?
I like using 70% dark chocolate bars, melted down. Chips work too, but I go for a high-quality brand with minimal additives.
Conclusion
This Black Forest Cheesecake is my go-to when I want something elegant and indulgent that also feels a little bit special. The layers of rich chocolate, creamy filling, and sweet-tart cherries never fail to impress. Whether I’m celebrating or just in the mood for something luscious, this dessert checks all the boxes—and I always look forward to that first bite.
📖 Recipe:
Print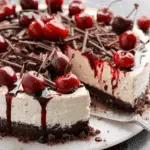
Black Forest Cheesecake
5 Stars 4 Stars 3 Stars 2 Stars 1 Star
No reviews
- Author: Isabella
- Total Time: 1 hour 10 minutes plus chilling time
- Yield: 10 slices
- Diet: Vegetarian
Description
This Black Forest Cheesecake features a chocolate cookie crust, rich and creamy chocolate cheesecake filling, and a vibrant cherry topping. It’s an indulgent dessert that balances deep chocolate flavors with bright, tart cherries—perfect for special occasions or a luxurious treat.
Ingredients
1 ½ cups chocolate cookie crumbs (gluten-free if needed)
¼ cup melted coconut oil or butter
2 cups cream cheese, softened
⅔ cup plain Greek yogurt or dairy-free yogurt
¾ cup maple syrup or honey
1 tsp pure vanilla extract
½ tsp almond extract
¼ cup unsweetened cocoa powder
2 tbsp cornstarch or arrowroot
½ cup melted dark chocolate
1 ½ cups frozen or fresh cherries (pitted)
2 tbsp maple syrup
1 tbsp lemon juice
1 tbsp cornstarch mixed with 2 tbsp water
Instructions
- Preheat the oven to 325°F (160°C) and line the bottom of a 9-inch springform pan with parchment paper.
- Mix the chocolate cookie crumbs with melted coconut oil or butter in a bowl, then press the mixture firmly into the bottom of the pan to form the crust. Bake for 10 minutes and set aside.
- In a large bowl, beat the cream cheese until smooth. Add yogurt, maple syrup, vanilla, almond extract, and cocoa powder, mixing until well combined.
- Stir in cornstarch and melted dark chocolate, blending until the batter is creamy and smooth.
- Pour the filling over the baked crust, smooth the top, and tap the pan gently to release air bubbles.
- Bake the cheesecake for 45–50 minutes, until the center is set but slightly jiggly. Turn off the oven, crack the door, and let the cheesecake sit inside for 1 hour.
- Remove and refrigerate for at least 6 hours or overnight.
- For the cherry topping, heat cherries, maple syrup, and lemon juice in a saucepan over medium heat until the cherries release their juices. Stir in the cornstarch slurry and simmer until thickened. Let cool completely.
- Before serving, spoon the cherry topping over the chilled cheesecake.
Notes
Swap the cherry topping with raspberry or strawberry compote for variety.
Use dairy-free cream cheese and yogurt to make it fully dairy-free.
Add mini chocolate chips to the filling for extra chocolatey richness.
Use store-bought cherry pie filling to save time.
Turn into mini cheesecakes using a muffin tin with liners for parties.
Refrigerate for up to 5 days or freeze individual slices for longer storage.
- Prep Time: 20 minutes
- Cook Time: 50 minutes
- Category: Dessert
- Method: Baking
- Cuisine: German-American
Nutrition
- Serving Size: 1 slice
- Calories: 310
- Sugar: 18g
- Sodium: 160mg
- Fat: 21g
- Saturated Fat: 12g
- Unsaturated Fat: 7g
- Trans Fat: 0g
- Carbohydrates: 27g
- Fiber: 2g
- Protein: 5g
- Cholesterol: 35mg


