
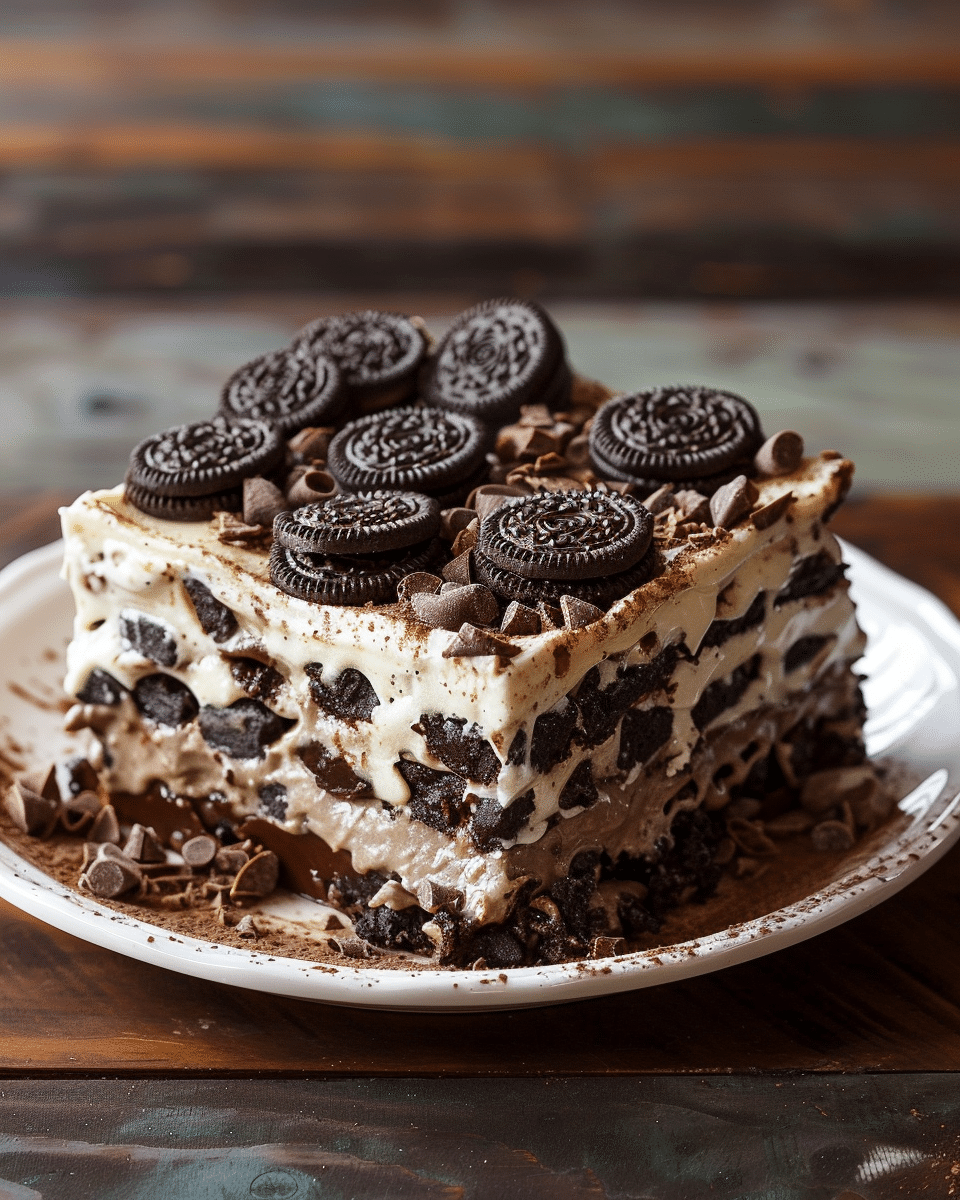
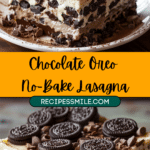
I love making this Chocolate Oreo No-Bake Lasagna when I want a dessert that looks impressive but requires absolutely no baking. With its crunchy Oreo crust, silky cream cheese layer, creamy vanilla and chocolate pudding, and fluffy whipped topping, every bite feels rich and indulgent. I finish it with a drizzle of chocolate syrup to give it that beautiful bakery-style touch. It is the kind of dessert I bring to gatherings when I want everyone to ask for the recipe.
Why You’ll Love This Recipe
I adore this recipe because it is incredibly easy to prepare while still looking elegant and layered. I don’t need to turn on the oven, which makes it perfect for warm days or busy holidays. I also love how the textures come together—crunchy crust, creamy filling, smooth pudding, and airy topping. I can prepare it ahead of time, let it chill, and simply slice and serve when needed. It is always a crowd-pleaser at potlucks and family dinners.
Ingredients
(Tip: You’ll find the full list of ingredients and measurements in the recipe card below.)
1 package (14 oz) Oreo cookies
½ cup unsalted butter, melted
8 oz cream cheese, softened
1 cup powdered sugar
16 oz whipped topping (such as Cool Whip), divided
1 box instant vanilla pudding mix
1 box instant chocolate pudding mix
3 cups cold milk
Chocolate syrup, for drizzling
Directions
I start by crushing the Oreo cookies into fine crumbs using a food processor or by sealing them in a bag and crushing them with a rolling pin.
In a medium bowl, I mix the crushed Oreos with the melted butter until everything is evenly combined. I press this mixture firmly into the bottom of a 9×13-inch dish to form the crust, then refrigerate it for 15 to 20 minutes so it can set properly.
In a large mixing bowl, I beat the softened cream cheese until smooth. I add the powdered sugar and mix until the texture becomes creamy. Then I fold in half of the whipped topping until the mixture is light and fluffy. I spread this evenly over the chilled crust.
In a separate bowl, I whisk together the vanilla pudding mix with 1½ cups of cold milk for about 2 minutes until thickened. I gently spread this layer over the cream cheese mixture.
In another bowl, I whisk the chocolate pudding mix with the remaining 1½ cups of cold milk until thick. I carefully spread it over the vanilla pudding layer.
I top everything with the remaining whipped topping, smoothing it evenly with a spatula. Then I drizzle chocolate syrup generously over the top for a decorative finish.
Finally, I refrigerate the dessert for at least 4 hours, until fully set. When ready to serve, I slice it into squares and enjoy it chilled.
Servings and timing
I prepare this dessert in about 25 minutes, and since there is no baking involved, the cooking time is zero. The total time, including chilling, is approximately 4 hours and 25 minutes.
This recipe makes 12 servings, with each serving containing about 420 calories.
Variations
I sometimes switch things up by using Golden Oreos for a lighter vanilla twist. When I want extra chocolate flavor, I mix mini chocolate chips into the cream cheese layer. I also like adding crushed Oreos on top for extra crunch. For special occasions, I drizzle both chocolate and caramel sauce over the whipped topping. If I want a richer flavor, I use chocolate whipped topping instead of regular.
Storage/Reheating
I store this dessert covered in the refrigerator for up to 3 days. I make sure it stays chilled so the layers remain firm and easy to slice. Since this is a no-bake dessert, I do not reheat it. If I need to make it further in advance, I sometimes freeze it for up to 1 month and let it thaw overnight in the refrigerator before serving.
Related Recipes:
FAQs
Can I make this dessert ahead of time?
Yes, I often make it the night before serving. I find that chilling it overnight helps the layers set beautifully and makes slicing even easier.
Can I use homemade whipped cream instead of whipped topping?
Yes, I can substitute homemade whipped cream, but I make sure it is stabilized so the layers hold their shape properly.
Can I use different pudding flavors?
Absolutely. I sometimes experiment with cheesecake pudding, white chocolate pudding, or even all chocolate for a richer version.
How do I get clean slices when serving?
I use a sharp knife and wipe it clean between each cut. I find that chilling the dessert thoroughly also helps create neat squares.
Can I freeze Chocolate Oreo No-Bake Lasagna?
Yes, I can freeze it tightly covered. I thaw it overnight in the refrigerator before serving, and it tastes just as delicious.
Conclusion
I truly enjoy making this Chocolate Oreo No-Bake Lasagna because it combines simplicity with a stunning layered presentation. The rich chocolate flavor, creamy textures, and crunchy crust make it irresistible every time I serve it. Whether I prepare it for holidays, parties, or a simple family treat, it never fails to impress.
📖 Recipe:
Print
Chocolate Oreo No-Bake Lasagna
5 Stars 4 Stars 3 Stars 2 Stars 1 Star
No reviews
- Author: Isabella
- Total Time: 4 hours 25 minutes
- Yield: 12 servings
- Diet: Vegetarian
Description
A rich and indulgent no-bake layered dessert made with a crunchy Oreo crust, creamy sweetened cream cheese, smooth vanilla and chocolate pudding layers, and fluffy whipped topping finished with a drizzle of chocolate syrup.
Ingredients
1 package (14 oz) Oreo cookies, crushed
1/2 cup unsalted butter, melted
8 oz cream cheese, softened
1 cup powdered sugar
16 oz whipped topping (such as Cool Whip), divided
1 box instant vanilla pudding mix
1 box instant chocolate pudding mix
3 cups cold milk
Chocolate syrup, for drizzling
Instructions
- Crush the Oreo cookies into fine crumbs using a food processor or by placing them in a sealed bag and crushing with a rolling pin.
- In a medium bowl, combine the crushed Oreos with melted butter and mix until evenly coated.
- Press the mixture firmly into the bottom of a 9×13-inch dish to form the crust. Refrigerate for 15–20 minutes to set.
- In a large bowl, beat the softened cream cheese until smooth. Add powdered sugar and mix until creamy. Fold in half of the whipped topping and spread evenly over the chilled crust.
- In a separate bowl, whisk the vanilla pudding mix with 1 1/2 cups cold milk for about 2 minutes until thickened. Spread over the cream cheese layer.
- In another bowl, whisk the chocolate pudding mix with the remaining 1 1/2 cups cold milk until thick. Carefully spread over the vanilla layer.
- Top with the remaining whipped topping and smooth evenly with a spatula. Drizzle chocolate syrup over the top.
- Refrigerate for at least 4 hours until fully set. Slice into squares and serve chilled.
Notes
Chill overnight for cleaner slices and better flavor.
Use stabilized homemade whipped cream if substituting for whipped topping.
Golden Oreos can be used for a vanilla variation.
Add mini chocolate chips or crushed Oreos for extra texture.
Store covered in the refrigerator for up to 3 days or freeze for up to 1 month.
- Prep Time: 25 minutes
- Cook Time: 0 minutes
- Category: Dessert
- Method: No-Bake
- Cuisine: American
Nutrition
- Serving Size: 1 square
- Calories: 420 kcal
- Sugar: 32 g
- Sodium: 380 mg
- Fat: 24 g
- Saturated Fat: 14 g
- Unsaturated Fat: 8 g
- Trans Fat: 0.5 g
- Carbohydrates: 48 g
- Fiber: 1 g
- Protein: 5 g
- Cholesterol: 45 mg


