Indulge in the sweet and creamy goodness of No-Bake Cherry Cheesecake Bars—a delightful dessert that combines a buttery graham cracker crust with a luscious vanilla cheesecake filling, topped with a vibrant cherry pie filling. Perfect for gatherings, holidays, or just a special treat, these bars are not only delicious but incredibly easy to make!
Ingredients:
For the Crust:
7 tablespoons unsalted butter, melted
1 1/2 cups graham cracker crumbs (about 9 whole crackers)
3 tablespoons granulated sugar
For the Filling:
8 ounces cream cheese, softened
1 cup powdered sugar
1 teaspoon pure vanilla extract
8 ounces Cool Whip (1 container)
21 ounces cherry pie filling (1 can)
Instructions:
Prepare the Crust:
Melt the Butter: In a medium bowl, melt the butter in the microwave for about 30 seconds or until fully melted.
Mix Ingredients: Stir in the graham cracker crumbs and granulated sugar until well combined.
Form the Crust: Press the mixture into an 8×8-inch baking dish, creating an even layer. Set aside.
Make the Filling:
Beat Cream Cheese: In a large bowl, use an electric mixer to beat the softened cream cheese until smooth and lump-free.
Add Sugar and Vanilla: Gradually add the powdered sugar and vanilla extract, blending until smooth.
Fold in Cool Whip: Gently fold in the Cool Whip until just combined, being careful not to overmix.
Assemble the Layers:
Spread the Filling: Spread the cream cheese mixture evenly over the graham cracker crust, smoothing the surface with a spoon or spatula.
Add Cherry Topping: Spoon the cherry pie filling evenly over the cream layer, ensuring it covers the surface.
Chill:
Refrigerate: Place the dessert in the refrigerator and chill for at least 2 hours to set before slicing and serving.
Serving Tips:
Chill Thoroughly: Ensure the cheesecake bars are well-chilled for at least 2 hours before serving. This helps them set properly and makes them easier to slice.
Cutting: Use a sharp knife or a pizza cutter to slice the bars into even pieces. Wipe the knife with a damp cloth between cuts for cleaner edges.
Garnishing: Consider garnishing each bar with a dollop of whipped cream and a cherry on top for an extra touch of elegance. Fresh mint leaves can also add a nice color contrast.
Plating: Serve the bars on a beautiful platter, and if you want to elevate the presentation, drizzle some chocolate or caramel sauce over the top.
Pairing: These cheesecake bars pair well with a scoop of vanilla ice cream or a cup of coffee, making them a delightful dessert option for any occasion.
Storage Tips:
Refrigeration: Store the cheesecake bars in an airtight container in the refrigerator for up to 3 days. This helps maintain their freshness and creamy texture.
Freezing: For longer storage, you can freeze the bars. Cut them into individual pieces and wrap each piece tightly in plastic wrap, then place them in a freezer-safe container or bag. They can be frozen for up to 2 months.
Thawing: When ready to enjoy, thaw the frozen cheesecake bars in the refrigerator for a few hours before serving. Avoid thawing them at room temperature, as this can make them too soft.
Avoid Topping: If you plan to freeze the bars, consider leaving the cherry topping off until you’re ready to serve. This will prevent the fruit from becoming mushy during freezing and thawing.
Related Recipes:
FAQs:
Conclusion:
No-Bake Cherry Cheesecake Bars are the perfect blend of simplicity and flavor, offering a nostalgic taste that will transport you back to childhood. Whether you’re hosting a gathering or simply treating yourself, these creamy, fruity bars are sure to satisfy your sweet tooth. Try this easy recipe today and enjoy a delicious dessert that everyone will love!
📖 Recipe:
Print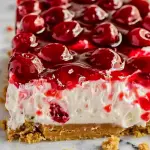
No-Bake Cherry Cheesecake Bars
- Total Time: 2 hours 15 minutes
- Yield: 9 bars
- Diet: Vegetarian
Description
Indulge in these delightful No-Bake Cherry Cheesecake Bars, featuring a buttery graham cracker crust, creamy vanilla cheesecake filling, and a luscious cherry topping. Perfect for holidays and gatherings, this easy dessert requires no baking, making it an ideal treat for any occasion!
Ingredients
For the Crust:
7 tablespoons unsalted butter, melted
1 1/2 cups graham cracker crumbs (from about 9 whole crackers)
3 tablespoons granulated sugar
For the Filling:
8 ounces cream cheese, softened
1 cup powdered sugar
1 teaspoon pure vanilla extract
8 ounces Cool Whip (1 container)
21 ounces cherry pie filling (1 can)
Instructions
- Prepare the Crust: Melt the butter in a medium bowl and mix with graham cracker crumbs and sugar. Press into an 8×8-inch baking dish.
- Make the Filling: Beat cream cheese until smooth, then mix in powdered sugar and vanilla. Fold in Cool Whip until just combined.
- Assemble the Layers: Spread the cream cheese mixture over the crust, then top with cherry pie filling.
- Chill: Refrigerate for at least 2 hours before slicing and serving.
Notes
For best results, let the bars chill completely before cutting.
These bars can be made up to a day in advance and stored in the refrigerator.
Feel free to customize the topping with other fruit fillings, such as blueberry or strawberry.
- Prep Time: 15 minutes
- Category: Dessert
- Method: No-Bake
- Cuisine: American
Nutrition
- Serving Size: 9 bars
- Calories: 290 kcal