
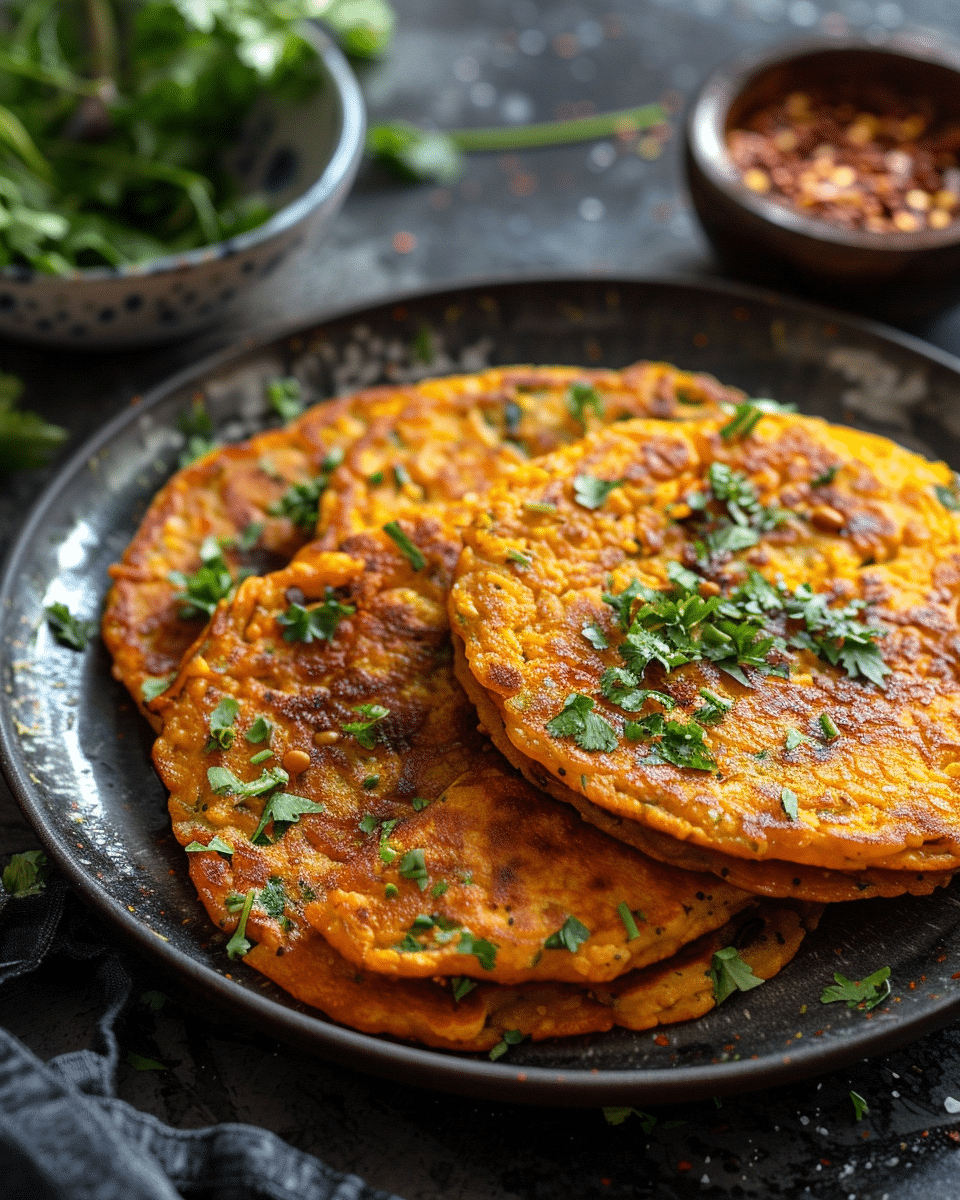
Masoor Dal Chilla (Savory Red Lentil Pancakes) is one of my favorite ways to turn simple red lentils into a satisfying, savory meal. I soak masoor dal until tender, blend it with ginger, green chilies, cumin, and turmeric, then stir in fresh onion and coriander. Once the batter hits a hot pan, it cooks into thin pancakes with lightly crisp edges and a soft, flavorful center.
I like serving these chillas for breakfast, but they work just as well as a nutritious snack or light lunch. With plenty of plant-based protein from the lentils and a short list of everyday ingredients, this is an easy recipe I can return to whenever I want something wholesome and filling.
Why You’ll Love This Recipe
I get plenty of plant-based protein from red lentils, making these chillas satisfying and nourishing.
I use simple ingredients that are easy to find and require very little preparation.
I can prepare the batter ahead of time, which makes cooking the chillas much easier in the morning.
I love the contrast between the lightly crisp edges and tender centers.
I can adjust the green chilies and spices depending on how mild or spicy I want the chillas.
I can serve them for breakfast, lunch, snacks, or even a light dinner.
I can easily keep the recipe vegan and gluten-free by using an appropriate gluten-free asafoetida or leaving it out.
Ingredients
(Tip: You’ll find the full list of ingredients and measurements in the recipe card below.)
1 cup masoor dal (red lentils)
Water, for soaking
1–2 green chilies
1-inch piece ginger
1/2 teaspoon cumin seeds
Salt, to taste
1/4 teaspoon turmeric powder
1 small onion, finely chopped
2 tablespoons fresh coriander leaves, chopped
2–3 tablespoons oil, for cooking
Pinch of asafoetida, optional
Directions
I start by placing the masoor dal in a bowl and rinsing it thoroughly under clean water. I then cover the lentils generously with water and let them soak for at least 4 hours or overnight, until softened.
Once the dal has soaked, I drain away all the soaking water and transfer the softened lentils to a blender.
I add the green chilies, ginger, cumin seeds, turmeric powder, and salt. I blend everything until smooth, adding only a small amount of water when necessary. I aim for a thick, pourable batter rather than a watery one.
I transfer the batter to a mixing bowl and stir in the finely chopped onion and fresh coriander. If I am using asafoetida, I mix it in at this stage as well.
I heat a non-stick skillet or tawa over medium heat and lightly grease the surface with oil.
Once the pan is hot, I pour a ladleful of batter into the center. Using the back of the ladle, I gently spread it outward in a circular motion to create a relatively thin pancake.
I drizzle a little oil around the edges and cook over medium heat until the underside is golden and the top begins to look set.
I carefully flip the chilla and cook the second side until golden and completely cooked through.
I repeat the process with the remaining batter, lightly greasing the pan with additional oil as needed.
I like serving the chillas warm, when the edges are at their crispiest. I pair them with chutney, yogurt, or another favorite dipping sauce.
Servings and Timing
This recipe makes approximately 4 servings.
Prep time: 10 minutes
Soaking time: 4 hours
Cooking time: 15 minutes
Total time: 4 hours 25 minutes
Servings: 4
Calories: approximately 200 kcal per serving
The exact number of chillas I get depends on how large and thin I spread each one. Cooking time can also vary slightly depending on the size of my pan and how many chillas I cook.
Variations
For a vegetable-packed version, I like adding finely grated carrot, chopped spinach, grated zucchini, or finely chopped bell pepper to the batter. I make sure not to add too many vegetables at once, since excess moisture can make the chillas harder to flip.
When I want more spice, I add extra green chili, red chili powder, or freshly cracked black pepper. For a warmer spice profile, I sometimes add a small amount of garam masala, coriander powder, or ajwain.
I can also make the chillas without onion when I want a simpler version. For extra freshness, I sometimes add chopped mint alongside the coriander.
If I want thicker and softer chillas, I spread the batter less thinly. When I prefer crispier chillas, I spread a smaller amount of batter into a thin layer and let the first side become nicely golden before flipping.
Storage/Reheating
I get the best texture when I eat masoor dal chilla fresh from the pan, but leftovers can still be stored successfully. Once the cooked chillas have cooled, I place them in an airtight container, separating layers with parchment paper if necessary. I keep them refrigerated and use them within about 2–3 days.
I can also prepare the batter ahead of time. I store it covered in the refrigerator and give it a thorough stir before cooking. If it thickens while chilled, I add a very small amount of water until it returns to a pourable consistency.
For reheating, I prefer using a skillet over medium-low heat with a tiny amount of oil. I heat each chilla on both sides until warmed through and lightly crisp again. A microwave also works when I am short on time, although the chillas tend to become softer rather than crispy.
Related Recipes:
FAQs
Do I have to soak masoor dal before making chilla?
Yes, I soak the red lentils before blending because soaking softens them enough to create a smooth batter. I usually soak them for at least 4 hours, although leaving them overnight also works well.
Why is my masoor dal chilla sticking to the pan?
I find that sticking usually happens when the pan is not properly heated, the surface is unsuitable, or I try to flip the chilla too soon. I use a well-heated non-stick or properly seasoned pan, lightly grease it, and wait until the underside has set and turned golden before flipping.
Can I make masoor dal chilla batter ahead of time?
Yes. I can prepare the batter in advance and refrigerate it in a covered container. Before cooking, I stir it thoroughly and check the consistency, adding just a splash of water if it has become too thick.
Can I make masoor dal chilla without oil?
I can reduce the amount of oil significantly when using a good non-stick pan. However, I find that a small amount of oil improves browning, helps prevent sticking, and gives the edges a more appealing crisp texture.
What can I serve with masoor dal chilla?
I like serving these savory lentil pancakes with green chutney, mint chutney, tomato chutney, or yogurt. For a more substantial meal, I can pair them with a fresh salad, cooked vegetables, or another light side dish.
Conclusion
Masoor Dal Chilla is a simple recipe that transforms everyday red lentils into a flavorful and satisfying meal. I especially like how the ginger, cumin, green chilies, onion, and coriander bring plenty of flavor without requiring a long list of ingredients.
Once I have soaked the lentils, the batter comes together quickly, and each chilla needs only a few minutes on the pan. Whether I make them for breakfast, an afternoon snack, or a light meal, I get a versatile savory pancake with crisp golden edges, a tender center, and plenty of wholesome lentil goodness.
📖 Recipe:
Print
Masoor Dal Chilla (Savory Red Lentil Pancakes)
- Total Time: 4 hours 25 minutes
- Yield: 4 servings
- Diet: Vegan
Description
Masoor Dal Chilla are savory red lentil pancakes flavored with ginger, green chilies, cumin, onion, and coriander. They cook up with lightly crisp edges and tender centers for a wholesome breakfast, snack, or light meal.
Ingredients
1 cup masoor dal (red lentils)
Water, for soaking
1–2 green chilies
1-inch piece ginger
1/2 teaspoon cumin seeds
Salt, to taste
1/4 teaspoon turmeric powder
1 small onion, finely chopped
2 tablespoons fresh coriander leaves, chopped
2–3 tablespoons oil, for cooking
Pinch of asafoetida, optional
Instructions
- Place the masoor dal in a bowl and rinse thoroughly. Cover generously with water and soak for at least 4 hours or overnight, until softened.
- Drain the soaked lentils well and transfer them to a blender.
- Add the green chilies, ginger, cumin seeds, turmeric powder, and salt. Blend until smooth, adding only a small amount of water as needed to make a thick, pourable batter.
- Transfer the batter to a mixing bowl and stir in the chopped onion, coriander, and optional asafoetida.
- Heat a non-stick skillet or tawa over medium heat and lightly grease it with oil.
- Pour a ladleful of batter into the center of the hot pan and use the back of the ladle to gently spread it into a relatively thin circle.
- Drizzle a little oil around the edges and cook over medium heat until the underside is golden and the top begins to set.
- Carefully flip the chilla and cook the second side until golden and cooked through.
- Repeat with the remaining batter, lightly greasing the pan with additional oil as needed.
- Serve the masoor dal chillas warm with chutney, yogurt, or your favorite dipping sauce.
Notes
For a vegetable-packed variation, add finely grated carrot, chopped spinach, grated zucchini, or finely chopped bell pepper, taking care not to add so much that the batter becomes watery.
For extra heat, add more green chili, red chili powder, or freshly cracked black pepper.
Garam masala, coriander powder, ajwain, or fresh mint can be added for additional flavor.
For softer chillas, spread the batter slightly thicker. For crispier chillas, spread it thinly and allow the first side to become golden before flipping.
Store cooked chillas in an airtight container in the refrigerator for 2–3 days. Reheat in a lightly oiled skillet for the best texture.
The batter can be prepared ahead and refrigerated in a covered container. Stir well before cooking and add a small splash of water if it becomes too thick.
Use gluten-free asafoetida or omit it if strict gluten-free preparation is required.
- Prep Time: 10 minutes
- Cook Time: 15 minutes
- Category: Breakfast
- Method: Pan Fry
- Cuisine: Indian
Nutrition
- Serving Size: 1 serving
- Calories: 200 kcal
- Sugar: 2 g
- Sodium: 300 mg
- Fat: 8 g
- Saturated Fat: 1 g
- Unsaturated Fat: 7 g
- Trans Fat: 0 g
- Carbohydrates: 24 g
- Fiber: 6 g
- Protein: 10 g
- Cholesterol: 0 mg